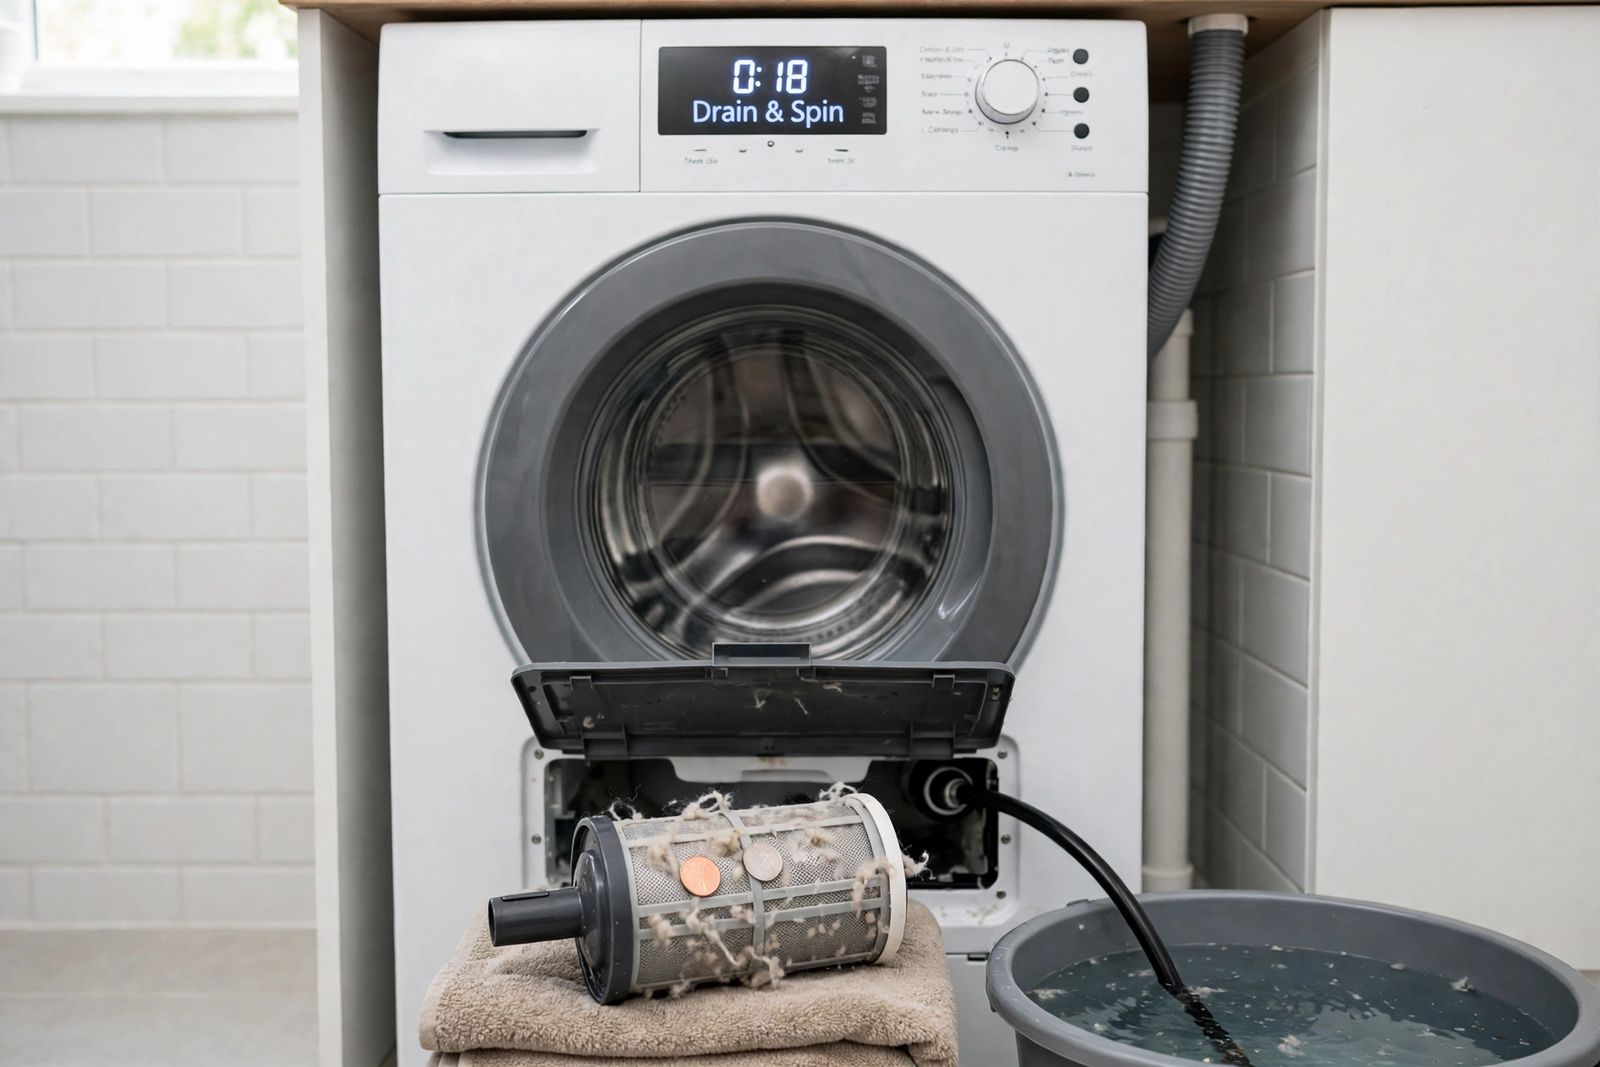
A washer that is not draining has almost always failed at one link of a single short chain, and the fix is to work that chain in the order the water travels instead of guessing: drain-pump filter / coin trap → drain hose (kink, clog, standpipe height) → pump test. Clean the filter first on a front-loader, because a filter packed with lint, coins and hair is the most common cause by a wide margin. Check the hose second — a kink behind the machine, a clog inside it, or a hose pushed too far into a standpipe that is the wrong height will stop a healthy machine dead. Only when the filter and the hose are both clear does the pump itself become the suspect, and the pump test is a listening test: a pump that hums but moves no water is jammed, a pump that runs but drains nothing has lost its grip on the water, and a pump that is silent is not being powered or has failed. One difference decides where you start: most front-loaders have a user-cleanable filter behind a small door at the bottom front; most top-loaders have no filter you can reach at all, so on a top-loader the hose and the lid switch carry the weight the filter carries on a front-loader.
First, the boundary. Water standing in the tub with a dry floor is a drain fault — this article. Water on the floor is a leak, a different fault with a different diagnosis, covered in washing machine leaking: do not run drain tests on a machine that is putting water on the floor. And a machine that will not start at all — no lights, or a lit panel whose cycle never begins — has not reached the drain stage yet: washing machine not starting works that dead-vs-alive split in order, and its lid-switch check is the same interlock named at link 3 below. And two false alarms to clear before the chain, because the makers themselves flag them. GE Appliances notes that pauses between cycle stages of up to 3 minutes are normal on many models — a machine that is pausing has not necessarily failed, and advancing a manual dial during a pause can make you miss the pump-out entirely. On a top-loader, GE’s companion page adds that a sloshing sound with no water visible in the basket is usually the balance ring, a sealed ring part-filled with salt water — normal, not a tub that failed to drain.
Before you open anything: safety, and getting the water out
- Unplug the washer, or switch it off at the breaker. You will be working at the lowest point of a machine that holds both water and mains power. Switching it off at the control panel is not enough.
- Note any error code before you reset anything. A drain code means the machine timed out trying to empty — the code does not name the blocked part, only that the water did not fall in time. The common ones are LG’s OE, Samsung’s 5C / 5E, and Whirlpool’s F9 E1 on front-loaders (drain time longer than expected); codes vary by model, so your manual’s list governs your machine.
- Do not open the filter on a full tub without draining first. The filter sits near the floor, and a full tub will come out of that opening at once. If the machine stopped during a hot wash, let the water cool first — it can still scald well after the cycle stopped.
- Drain the tub through the small emergency drain hose first, if your front-loader has one. It sits next to the filter behind the same bottom-front flap: pull it out over a shallow pan, remove the cap, and let it run in stages, emptying the pan as it fills. No drain hose fitted? Loosen the filter a quarter turn at a time instead, tightening it again to pause the flow while you empty the pan.
- On a top-loader, bail. Top-loaders typically have no emergency drain hose and no accessible filter, and Maytag’s own guidance is plain that a top-loader often cannot be manually drained through a hose at all — scoop the water out with a jug into a bucket, and sponge the last of it.
Once the tub is empty enough to work, run one short Drain & Spin (or Drain) cycle with a few litres of water in the tub and listen at the bottom front of the machine. That sound is the pump test at link 3, and hearing it now tells you which family your fault is in before you touch a part: water has nowhere to go, or the pump is not pushing. Do not run repeated drain attempts on a pump that is grinding or humming without moving water — a jammed pump left running can burn its motor out.
The drain-failure chain
Work the links in this order. At each link, look for its naming sign first — if the sign is present, you have your cause and you can stop; if the link is clean and its sign is absent, move to the next link without replacing anything.
| Link | Check it like this | The sign that names this link | Front-load vs top-load |
|---|---|---|---|
| 1. Drain-pump filter / coin trap | Bottom-front flap open, tub drained through the emergency hose first, filter unscrewed counter-clockwise, rinsed, and the housing checked — the pump impeller is visible inside it and should turn freely with a slight magnetic click per turn | Filter mesh or housing packed with lint, coins, hair grips, buttons or a sock — or a hard object wedged behind the impeller. The commonest cause, and it is not close | Front-load: this is link 1, reachable by hand on most models. Top-load: most models have no user-accessible filter — skip to link 2, and treat a suspected internal trap as a service job |
| 2. Drain hose | Trace the corrugated hose from the back of the machine to the standpipe or sink: no kinks or crushed sections, hose flushed clear, end no more than about 4.5″ into the standpipe, not sealed or taped in, standpipe at the height your maker specifies | Hose folded shut where the machine was pushed back, sludge or a small item inside it, water rising out of the standpipe rim while the hose itself stays dry (the house drain, not the washer), or a machine that fills and drains at the same time (the hose end sits too low or too deep and is siphoning) | Same on both types. The one link that is identical on every washer — and the first link on a top-loader, which has no filter to check |
| 3. Pump test | A few litres of water in the tub, one Drain & Spin cycle, listen at the bottom front | Steady whirr, no water leaving: pump runs but the path is blocked or the impeller has come loose on its shaft. Loud hum or buzz, no whirr: power is reaching the pump but the impeller is jammed. Grinding or rattling: a hard object loose in the pump chamber. Complete silence: no power to the pump, a failed pump motor, or a control/lid-lock fault upstream | Same test on both types. On a top-loader that is silent, check the lid switch before the pump; on a front-loader, the door lock plays that role |
These three links belong in this order, as one chain with a naming sign per link and the front-load/top-load split stated per link. Split across separate brand pages, the same checks lose the chain — and the filter is often described as if every washer had one you could open, which is not true — the correction in the box below. The chain is the article; the sections below are each link explained.
The correction most guides get wrong: your washer may have no filter to clean. Filter-first advice is everywhere, but Whirlpool’s own drain guide states it plainly: washer filter locations vary by model, not all of them are accessible, and many modern models do not have filters at all. That is especially true of top-loaders. If your machine has no bottom-front flap, do not start removing panels hunting for a filter that may not exist — your chain starts at the hose (link 2), and the trap inside the machine is a technician’s job. The same honesty applies to standpipe heights, which the guides often give as one universal number: they are not universal. Whirlpool’s product help sets a minimum standpipe height of 30″ for its front-loaders, Maytag publishes 39″ minimum to 96″ maximum for most of its washers, and GE sets a maximum pump height of 8 feet (5 feet for compacts) — three makers, three different figures. Your manual’s figures govern your machine; any guide that gives you one height for every brand, or attributes the 39–96″ range to a safety regulator …[truncated 9116 chars], has not checked the makers. (One widely copied guide attributes that range to the Consumer Product Safety Commission; the 39–96″ range is in fact Maytag’s own published installation range.)
Link 1: The drain-pump filter / coin trap
The filter exists to catch what would otherwise reach the pump: lint and hair, and the solid traffic of pockets — coins, buttons, hair grips, screws, bra underwires, the occasional sock. It loads gradually, which is why this fault so often announces itself as slow draining or a drain code on large loads before it becomes a tub that will not empty at all.
Clean it, in this order. Machine unplugged, tub drained through the emergency drain hose as above, towels and a shallow pan in place. Open the bottom-front flap, unscrew the filter counter-clockwise and pull it out. Clear everything off the mesh, rinse it, and clear the housing behind it by hand — then look inside: the pump impeller sits in that housing. It should turn freely, with a slight magnetic resistance about once per turn; that click is normal. Something wedged behind it — a coin or underwire that got past the filter — comes out with long-nose pliers, gently. Refit the filter clockwise until it seats firmly: a filter put back loose or cross-threaded leaks at the next cycle, a fault covered from the leak side in washing machine leaking. Maytag’s guidance puts routine filter cleaning at at least once a month on many of its models; the full routine, filter included, is part of how to clean a washing machine.
Top-load difference, stated plainly: there is usually no equivalent step. Most top-loaders have no owner-accessible filter — Whirlpool says so about its own range above — so debris that gets past the basket collects in the pump or the tub-to-pump hose inside the cabinet. That is why a top-loader with a clear hose and a working lid switch goes to a technician sooner than a front-loader does: its link 1 is behind panels, not behind a flap.
Link 2: The drain hose — kink, clog, standpipe height
Everything the pump pushes out travels one corrugated hose to the standpipe or a laundry sink, and this link fails in four distinct ways:
- Kinked or crushed. The classic is self-inflicted: the machine is pushed back after cleaning or a repair and the hose folds flat against the wall or is trapped under a foot. It can fold almost shut without visible damage. Pull the machine a few inches forward and trace the whole run by hand.
- Clogged. Lint, detergent sludge and small items narrow the hose over years, or block it at once. Disconnect it over a bucket — power off, towels down — and flush it through; water should run freely end to end.
- Pushed too far into the standpipe, or sealed in. Whirlpool’s product help sets the limit at 4.5″ (113 mm): deeper than that, drained water can siphon back into the washer. And the hose must never be taped or sealed into the drainpipe — there must be a gap for air, because that air gap is what breaks the suction; a sealed hose can siphon the machine’s water out continuously as it fills, which presents as a washer that fills and drains at the same time and never gets on with the wash.
- Standpipe at the wrong height, or the standpipe itself blocked. Too low and the machine can siphon; too high and the pump cannot lift the water — GE’s ceiling is 8 feet for full-size machines. The height figures are the makers’, and they differ (see the correction box): your manual governs. A blocked standpipe is diagnosed in one move from GE’s support page: take the hose out and pour a quart of water into the standpipe — if the quart will not drain away, the fault is the house drain and a plumber is the fix, not a washer part. Watch the standpipe through a drain to confirm it the other way: water rising out of the pipe’s rim while the hose and its connections stay dry convicts the drain, not the machine. The kitchen version of the same verdict — the appliance is fine and the shared house drain is not — is one of the first tests in dishwasher not draining, and a standpipe that drains slowly on its own is cleared with the methods in how to unclog a drain.
One installation-only cause belongs here because it produces a total, sudden failure on a healthy machine: if the washer has never drained since it was installed or moved, check the waste connection itself — a hose kinked during the push-back, or a blanking cap left inside a new waste fitting where the hose connects. No clog forms that completely, that suddenly, on that exact day.
Link 3: The pump test — listen, then judge
With the filter clean and the hose clear, the pump is the remaining suspect, and the test needs no tools: water in the tub, one Drain & Spin, ears at the bottom front.
- A steady whirr or hum, and water leaving normally — the pump is fine; if the tub still ends the cycle wet, go back to link 2’s heights or to the settings and suds causes below.
- A steady whirr, but no water leaving — the pump is turning and the path is blocked somewhere you have not yet cleared (the sump hose between tub and pump is the remaining stretch, and it is inside the cabinet), or the impeller has come loose on its shaft and is spinning without moving water. Either way this is the end of the hand-reachable chain.
- A loud hum or buzz with no whirr, and no water moving — the pump has power and cannot turn: something is jammed in it. Unplug, go back to link 1’s housing and check behind the impeller once more. A jam cleared here is the whole repair. GE’s front-load page is blunt about the same symptom — a tub full of water and a machine that just hums goes to service — because on GE’s design the jam is not always reachable from the filter housing.
- Grinding or rattling — a hard object loose in the pump chamber. Stop the cycle; running it grinds the object against the impeller.
- Complete silence — the pump is not running at all, and a blockage cannot cause that: blockages stop water, not motors. Silence means no power is reaching the pump (a connector vibrated loose, a failed winding) or no command is being sent (control fault — or the safety interlock below, which is checked first because it is free). One caution before condemning a silent pump: test with water actually in the tub. Some machines only power the pump when the water-level sensor detects water, so a silent pump on an empty tub can be normal behaviour, not a failure.
A pump that passes the listen test but is suspected electrically can be resistance-tested across its terminals with the machine unplugged and the connector off — an open-circuit reading means the winding has failed — but that is multimeter work on a disconnected component; anything that requires testing with the machine live belongs to a technician, without exception.
The causes that are not blockages: lid switch, door lock, suds, settings
Four causes sit outside the chain because nothing is blocked and the pump is healthy:
- The lid switch (top-load) or door lock (front-load). The machine will not drain or spin until it knows the lid or door is closed. A failed switch leaves a top-loader full of water, refusing to advance; GE’s factory service guidance puts the lid switch on its short list for exactly this symptom. The quick check on a top-loader: press the switch by hand where the lid meets it and listen for the click, and look for the lid-closed light where one is fitted. A switch with no click, or a front-load door that will not lock, is a replaceable part — but it is also the last free check before silence at link 3 is blamed on the pump or the board.
- Suds. Too much detergent, or non-HE detergent in an HE machine, fills the tub with foam the pump cannot move and the sensors misread; the machine pauses or extends the cycle and it looks like a drain failure. Whirlpool’s guide names excessive detergent directly as a cause of incomplete draining. The tell is foam visible in the standing water. Let it settle, run an empty rinse with no detergent, and dose to the label, not the cap, afterwards.
- Cycle selection. A Gentle, Delicate or Hand Wash cycle set to a slow or no-spin speed leaves water in the load by design; so does a soak or rinse-and-hold setting that intentionally pauses with the tub full. Check the setting before the machine.
- An unbalanced load. A single heavy item or a load bunched to one side makes the machine cut the spin — and with it the final drain — short. Redistribute, add an item or two if the load is one bulky piece, and run Drain & Spin. GE and Maytag both put redistribution ahead of any part on their lists.
Draining slowly is the same fault, earlier
A washer that drains, but slowly — clothes wetter than they used to be, a drain code that appears only on big loads, water that lingers and then eventually goes — is not a different problem. It is this chain with a partial blockage in it: a filter loading up but not yet packed, a hose narrowing with sludge, a standpipe that takes most of the flow but not quite all of it at full pump speed. Work the same links in the same order. Partial clogs do not clear themselves; the load that produces a slow-drain code this month produces a tub that will not empty at all a few months later, and the filter you clean at the slow stage is a ten-minute job compared with bailing a full tub at the stopped stage. The one slow-drain cause that is not a blockage is the setting: a low-spin or no-spin cycle leaves clothes wet by design, and an unbalanced load makes the machine cut the spin short — redistribute and run Drain & Spin before you open anything, as both Whirlpool and Maytag direct.
Keeping it from happening again
Most repeat drain faults are the same debris arriving by the same route. Empty pockets before every wash — coins, hair grips and tissues are the finds that recur in filters and pump chambers — and wash underwired bras and small items in a mesh bag, because a loose underwire is a classic pump jam. Clean the filter on the maker’s schedule rather than at the next failure, and after any job that moves the machine — a move, a new floor, a repair — push it back and then check the drain hose run before the first wash: a hose kinked by the push-back is a drain fault installed by hand. Use HE detergent at the measured dose in an HE machine; the suds section above is a drain cause, not just a wash-quality issue.
When to call a professional, and when to replace instead
Stop and call a technician if the whole chain is clear and the washer still will not drain; if the pump is silent and the lid switch or door lock checks out; if the jam is in the pump or the sump hose on a machine whose filter you cannot reach (most top-loaders); if there is a burning smell, a tripping breaker, or water leaking as well as standing; or if a drain code returns immediately after a full filter and hose clean. Past that line the likely causes — a failed pump, a failed pressure switch, a control that never sends the drain command — are parts-and-testing jobs.
On repair or replace: everything in the chain itself is cheap or free — a cleaned filter, a straightened or flushed hose, a corrected standpipe — and a drain pump on an otherwise sound machine is normally worth fitting at almost any age, because drain faults are among the most repairable washer failures there are. Replacement enters the discussion when the machine is well into its second decade and the fault is the control board, when a second major fault is queueing behind this one, or when the quote approaches about half the price of a comparable new washer on an already old machine. Judge it by the named fault, not the symptom: a tub of standing water looks identical whether the cause is a free filter clean or a dead board.
Frequently asked questions
Why is there still water in my washer after the cycle ends? Because the water could not leave, or was never told to. Work the chain: filter first on a front-loader, hose on any machine, pump test last. But first clear the two false alarms — a normal pause of up to 3 minutes between stages (GE), and, on a top-loader, a sloshing sound with no visible water, which is the balance ring and not water at all. A soak or rinse-and-hold setting also leaves a full tub on purpose.
How do I drain a washer full of water by hand? Front-loader: unplug, then use the small emergency drain hose next to the filter, into a shallow pan in stages; if there is no hose, loosen the filter a quarter turn at a time and re-tighten to pause. Top-loader: bail with a jug — top-loaders typically have no emergency drain hose and no accessible filter, and Maytag notes a top-loader often cannot be drained through a hose at all.
My top-load washer has no filter flap. Where is its filter? It probably does not have one you can reach. Whirlpool states that many modern models do not have filters, and others are not accessible — top-loaders are the usual case. Do not remove panels hunting for it: your chain starts at the hose (link 2), then the lid switch, then the pump test; a clog inside a top-loader’s pump or sump hose is a service job.
Why won’t my washer drain or spin? Because the spin is locked behind the drain: the machine checks the water has gone before it will spin, so a drain fault presents as both. Clear the chain and the spin usually returns on its own. If the tub empties fully and it still will not spin, the remaining suspects are water-level sensing (a blocked pressure chamber or sticking switch telling the control the tub is still full), a failed lid switch or door lock, or an out-of-balance load the machine keeps refusing. That spin-only fault, with the drain proven, is worked in full — starting with the small-load test, then split by machine type — in washing machine not spinning.
It stopped draining right after the machine was moved or installed. Why? Because the fault was probably installed with it. The usual causes are all at link 2: the hose kinked or crushed when the machine was pushed back, the hose pushed too far into the standpipe, a standpipe at the wrong height — or, on a brand-new plumbing connection, a blanking cap left inside the waste fitting the hose connects to, which seals the outlet completely. A machine that drained perfectly before the move and not once since is an installation fault until the hose run has been checked end to end.
Can I pour drain cleaner into the washer or the standpipe? Not into the washer — chemical drain cleaner has no place inside an appliance whose seals, hoses and pump it can damage, and it cannot dissolve the things that actually block this chain (a coin, a sock, a packed filter). If GE’s quart test shows the standpipe itself is blocked, that is house plumbing: clear it as plumbing, or call a plumber, with the washer’s hose out of it. The washer’s own chain is cleared by hand, link by link, or not at all.
How often should the pump filter be cleaned? On the maker’s schedule, not at the next failure. Maytag puts it at at least once a month for many of its models; other makers say every few months. A machine in a household that washes pet bedding, work clothes or anything with pockets regularly checked earns the shorter interval.
This article is general information, based on the manufacturer support pages linked above (Whirlpool, GE Appliances and Maytag). Filter access, standpipe heights, hose insertion limits and error codes differ by model — in places the makers’ own published figures differ from each other, as the correction box shows — and your washer’s manual governs your machine. Anything that needs testing with the machine live, and any fault inside a sealed cabinet, belongs to a qualified technician.