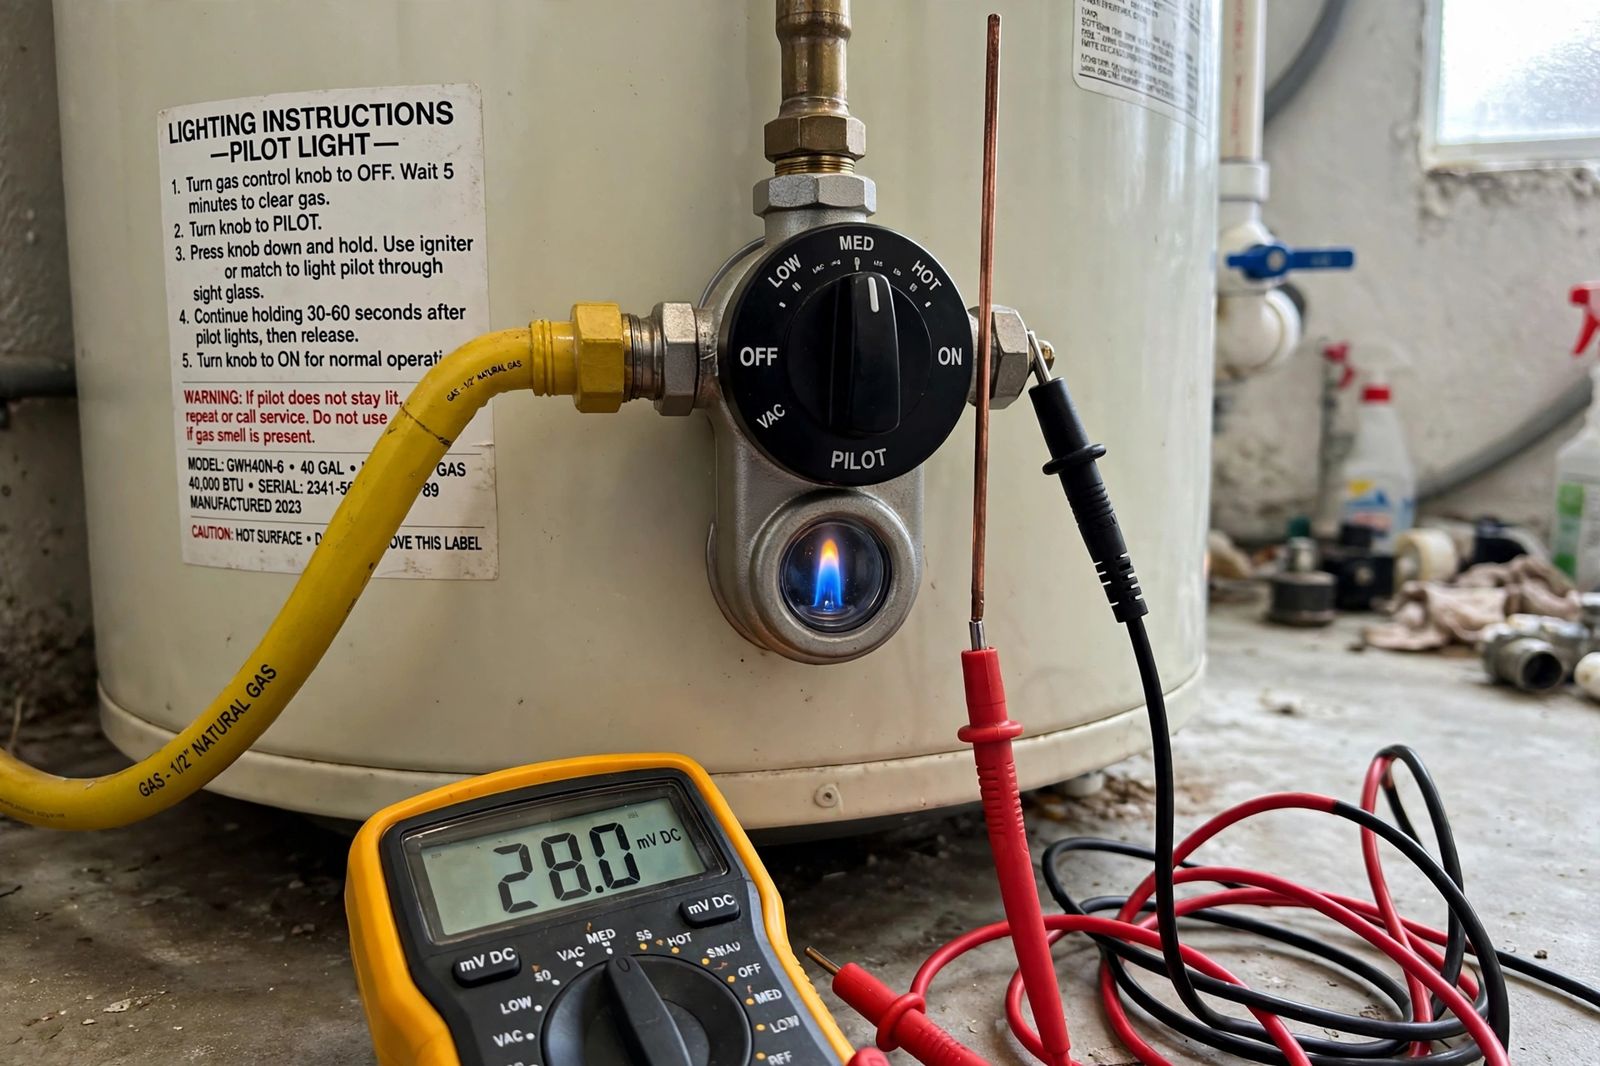
If your water heater pilot light keeps going out, do not start by replacing parts — start by watching when it goes out on one correct relight. If it stays lit while you hold the control knob in but dies the moment you release it, the fault is in the thermocouple path: the flame sensor is not proving the flame to the gas valve. If it lights, holds, fires the burner, and then dies minutes or hours later, the fault is almost never that sensor alone — think air and gas delivery instead: a clogged air intake or flame arrestor, a draft or vent problem, a weak flame from a clogged pilot tube, or a failing gas control valve. One careful relight, watched properly, splits those two very different repairs. Everything below is that test, in order, with the point where homeowner checks end.
Safety — read this before any check. If you smell gas (a rotten-egg smell) at any point, stop, leave the house, and call your gas company or emergency service from outside. Do not relight anything, do not operate electrical switches, and do not use a phone inside the building. A. O. Smith’s official pilot-light guidance gives the same stop rule, and its relight sequence starts with turning the gas off and waiting at least 10 minutes for built-up gas to disperse. Never store gasoline, paint thinner or solvents near a gas heater, never bypass, tape down or jumper a thermocouple, thermal switch or any other safety sensor to keep a flame alive, and never cap or plug the temperature-and-pressure (T&P) relief valve. If any step below feels beyond you, stopping and calling a licensed plumber or gas technician is the correct outcome.
The relight-and-watch test: the original asset
Most guides give you a list of causes and leave you to guess which one you have. The timing of the failure is the diagnosis, so run this test once, correctly, and record what happens before you touch anything else.
The correct relight (by your heater’s label first — knob layouts vary):
- Turn the gas control knob to OFF and wait at least 10 minutes if your heater follows A. O. Smith’s instruction. Waiting times differ by maker — follow the lighting instructions printed on your own heater over any general guide, including this one. If you still smell gas after the wait, stop: leave and call the gas company from outside.
- Turn the knob to PILOT, press and hold it fully in, and press the igniter button repeatedly — on A. O. Smith models, about once per second for up to 90 seconds — until the pilot catches. Watch through the sight glass: a healthy pilot is a small, steady blue flame that wraps the tip of the thermocouple or thermopile.
- Keep holding the knob for a full 30–60 seconds after the flame lights — about a minute is the figure in American Water Heater’s lighting steps quoted across the manuals. This hold is the test, not dead time: the flame is heating the sensor that must take over from your thumb.
- Release the knob slowly and watch, with a clock. Note exactly what happens and when. Then turn the knob back to ON (near 120°F) only if the pilot holds.
Now read the result off this table — this two-branch split is the whole method:
| What you watch happen | Branch | What it means | Test order / next step | Who finishes it |
|---|---|---|---|---|
| Stays lit while the knob is held, dies within seconds of release — every time, even after a full 60-second hold | A: Thermocouple path | The sensor is not producing or delivering enough millivolt signal to hold the gas valve’s safety magnet open: dirty or heat-damaged tip, tip out of the flame, loose connection at the valve, a tripped thermal switch or ECO in the same circuit, or — last — a failed magnet inside the gas valve itself | Thermocouple test order below: 1) flame contact, 2) connection tightness, 3) millivolt test, 4) only then the valve | Connection check: careful homeowner on older open models only. Test, sensor and valve: gas technician — on modern sealed (FVIR) burners, all of it |
| Lights, holds on release, burner fires — then dies minutes, hours or a day later, often after a heating cycle, a windy spell, or a door opening | B: Draft / pilot tube / gas valve path | The sensor proved the flame at relight, so something later starved, cooled or blew out the flame: lint-clogged air intake or flame arrestor, a draft or vent/downdraft problem, a weak flame from a partly clogged pilot tube or orifice, unsteady gas pressure, or a gas valve that drops out as it warms | 1) Clean/check the air intake and arrestor area and clear stored items from the base. 2) Note the pattern — windy day? garage door? exhaust fan or dryer running? 3) Judge the flame: small, lazy or yellow = weak pilot, not a dead sensor. 4) If other gas appliances also falter, call the gas utility. 5) Valve last, after air and flame are proven | Intake cleaning and draft notes: you. Pilot tube, venting, pressure and valve: technician / utility |
| Will not light at all — no flame, or no spark | Neither branch yet | No gas reaching the pilot (shut-off closed, air in the line after gas work), a failed igniter or loose igniter wire, or a clogged pilot line | Prove the supply first: shut-off handle parallel to the pipe = open; check another gas appliance. Dim the lights and watch for a spark at the igniter. Stop after two or three correct attempts | Supply check: you. Everything past it: technician |
| Pilot stays lit, burner never fires | Past the pilot | The pilot system has done its job; the gas control valve/thermostat is not calling for or not delivering burner gas, or a high-limit has tripped | Check the temperature setting once (near 120°F). Record any status-light flash pattern. Do not keep relighting a lit pilot | Technician |
That table is why “keeps going out” is two problems wearing one name. Branch A fails at the exact second your thumb stops doing the sensor’s job. Branch B passes that moment and fails later, when air, draft or gas delivery changes. Replacing a thermocouple for a Branch B heater — a very common wasted repair — changes nothing, because the old sensor was proving the flame fine at relight.
If the wider symptom is simply a cold house with no diagnosis yet, no hot water in house works the supply-first order for both fuels and splits the electric from the gas checks in full — this page assumes you have already found a gas heater with a pilot that will not stay lit.
Two corrections the top results get wrong — check these before you blame a part
Correction 1: a 10–15 second hold proves nothing. At least one widely read local guide tells you to hold the button for only 10–15 seconds after the flame appears. That is too short, and it manufactures Branch A failures out of healthy heaters. The manufacturers’ figures agree with each other and not with that shortcut: hold 30–60 seconds — American’s steps say about one minute — because the thermocouple or thermopile needs that heat soak to generate enough voltage to hold the valve on its own, and on A. O. Smith electronic controls it can take up to 90 seconds of continuous pilot operation before the thermopile reaches normal operating temperature and the status light starts to blink. Release at 15 seconds, watch it die, and you have learned nothing except that a cold sensor behaves like a dead one. Always re-run the relight with the full hold before anyone condemns the sensor.
Correction 2: the wait before relighting is 10 minutes on A. O. Smith heaters, not 5 — and never 30 seconds. The same short-hold guide gives a 5-minute wait in one step and 30 seconds in another. A. O. Smith is explicit: turn the gas off and wait at least 10 minutes for residual gas to dissipate, because a combustion chamber that has been filling with unlit gas is exactly the wrong place to make a spark. Other makers print different waits on their labels — which is the real rule: your heater’s label wins. What no maker prints is “barely wait at all.” If you have made several failed attempts in a row, stop, give it the full label wait, and start the watch test once, cleanly.
A third piece of common advice deserves the same caution: poking a needle or wire through the pilot orifice to clear it. The orifice is a metered opening; enlarging or scoring it changes the flame permanently. Makers route pilot-tube and orifice cleaning through the pilot assembly as service work — treat it as a technician’s job in Branch B, not a first try with a sewing needle.
Branch A in detail: the thermocouple test order
Work this order exactly — each step rules out a cheaper, commoner cause before the next one is allowed to condemn a part. A. O. Smith states the mechanism plainly: the thermocouple/thermopile’s job is to power the gas valve and shut off the flow of gas if the pilot goes out, so if the sensor itself is broken, the pilot safety valve never receives power and the pilot will not remain lit once the knob is released. The question is which link in that small chain has failed.
- Flame contact first (look, do not touch). Through the sight glass, the blue pilot flame should envelop the top 3/8 to 1/2 inch of the sensor tip — the figure in Rheem’s service guidance quoted in the maker manuals. A tip sitting beside the flame, below it, or in its weak yellow edge will never get hot enough, however new the part is. A flame too small to wrap the tip is not a sensor fault at all — it belongs to Branch B (weak pilot) even though the symptom looks like Branch A. This is why the branches must be read together.
- Connection second. At the gas valve, the thermocouple connection should be finger-tight plus about a quarter turn with a wrench — no more. Loose, it drops the millivolt signal; cranked far past that, it can damage the valve’s magnet assembly. On electronic models, also suspect loose thermopile wiring connectors: A. O. Smith’s manual notes that if you can see the pilot but the status light never starts blinking, the pilot may not be heating the thermopile sufficiently, the thermopile may be defective, or a wiring connector may be loose — three causes, one symptom, in that order.
- Millivolt test third — a technician’s measurement, with two different scales. Do not mix these up, because the two sensor types live in different worlds:
- Thermocouple (older, standing-pilot heaters): American Water Heater’s own troubleshooting flowchart test is: disconnect the thermocouple from the gas valve, clip the meter leads to the copper body and the end terminal, light the pilot and hold it lit — after 45 seconds the meter should read 12 millivolts DC or more. Below that, the flowchart replaces the thermocouple; at or above it, the fault hunt moves on to combustion air and then the gas valve. A healthy thermocouple’s open-circuit output is typically around 25–30 millivolts, so 12 mV is a pass/fail floor under this test’s conditions, not a sign of a strong part.
- Thermopile (newer heaters with an electronic gas control and status light): a thermopile is a bundle of thermocouples that also powers the control electronics, and its output is in the hundreds of millivolts — a different scale entirely, so a thermocouple threshold must never be applied to it. On these heaters, read the status light first: one flash every 3 seconds is normal operation; 2 flashes means the pilot is lit but thermopile output is low — weak pilot, loose wiring or a failing thermopile, in that order. Record the flash pattern before you change anything; it is the valve’s own account of the fault.
- Gas valve last. Only when flame contact is right, the connection is right and the sensor tests good does the evidence point inside the valve — a failed safety magnet or solenoid that will not hold even with a good signal. The valve is the heater’s most safety-critical part. Its testing and replacement are licensed gas work, full stop.
One boundary runs through all four steps: on modern flammable-vapor-ignition-resistant (FVIR) heaters the burner sits in a sealed combustion chamber, and opening it, removing the pilot assembly or breaking gas connections is a technician’s job. The homeowner’s share of Branch A is the correct relight, the watch, the flame judgement and the flash-code note — which, done properly, is the diagnosis half-finished before the technician arrives.
Branch B in detail: air, draft, weak flame, then valve
Branch B heaters light honestly and die later, so hunt what changes later:
- Clogged combustion air: the intake screen and flame arrestor. Since the early 2000s, FVIR heaters draw air through openings and a filter at the base and across a flame arrestor under the burner. Lint, dust and pet hair — worst in garages and laundry rooms, worst of all next to a dryer — choke that path until the burner and pilot starve. Bradford White’s service guidance notes its thermal switch shuts the burner and pilot down on restricted airflow from severe lint, dust or oil accumulation on the arrestor plate, which is why this fault often trips after a heating cycle, not at relight. A. O. Smith’s owner steps for its models: gas control OFF, let the heater cool, remove the outer door and any snap-in filter, brush and vacuum the intake openings until the brush comes out clean, vacuum around the base, and refit the filter — the heater must have its filter installed to run properly. In a dusty room, check it monthly. Keep at least a clear space around the base and never store items against the heater.
- Drafts and venting. A pilot that dies when the garage door opens, on windy days, or when a kitchen or bathroom exhaust fan or a dryer runs is telling you about air movement, not parts. Downdrafts down a blocked, disconnected or damaged vent can do the same and are the dangerous version: exhaust spilling back instead of venting out is a carbon-monoxide risk. Look — from outside the chamber — for a vent pipe that is loose, rusted through or disconnected; if you find that, turn the heater off and call a technician. Keep a working CO alarm on the heater’s level and outside sleeping areas.
- A weak pilot flame: clogged pilot tube or orifice, or low gas pressure. A small, lazy, yellow-tipped flame cannot keep the sensor at temperature through a burner cycle, even if it survived your 60-second hold. Dust, debris or a spider web in the pilot tube is the usual cause; low or unsteady house gas pressure is the other. Split them with the house: if a gas stove or furnace is also weak or faltering, the supply is the suspect and the call is to the gas utility. If only the heater falters, the pilot assembly needs service. Either way, do not needle the orifice yourself (see Correction 2’s companion warning above).
- The gas control valve, dropping out warm. A valve that holds a cold pilot and drops it as the heater works can be failing internally — but it earns that verdict only after air, draft and flame have been proven, because all three imitate it. If a new sensor was already fitted and the pilot still dies later in the day, that history itself points back to air and venting: technicians report that a pilot still going out after a sensor replacement is usually a combustion-air or venting fault, not a second dead sensor.
And one pattern that belongs to neither branch alone: a pilot out alongside water on the floor. Stop diagnosing ignition and make the heater safe first — water heater leaking gives the shut-off order (energy off, then cold water off) and separates fixable valve and fitting leaks from the one tank-body leak that means replacement.
What a healthy pilot looks like — and what each wrong look means
Judge the flame before you judge any part. Healthy: steady, mostly blue, quiet, wrapping the top 3/8 to 1/2 inch of the sensor tip, unchanged when the main burner fires. Small and weak, with yellow in it: starved pilot — clogged tube/orifice or low pressure (Branch B). Yellow, lazy, wavy or sooty: incomplete combustion from a dirty burner or too little air — turn the heater off and call a technician; this flame can produce carbon monoxide and should never be relit-and-forgotten. Strong but dancing or lifting when doors open or wind rises: draft reaching the flame (Branch B). Perfect flame that still dies on release: the flame is exonerated — that is Branch A, and the sensor circuit is the hunt.
Repair or replace?
Everything in both branches — a thermocouple or thermopile, a pilot assembly clean, an arrestor clean, even a gas control valve — is a repair on a sound tank. Age and tank condition decide whether the repair is worth buying. Rheem puts a traditional tank heater’s typical life at 8–12 years and suggests planning replacement from around year 10: a sensor on a six-year-old heater is an easy repair, while a gas valve on a twelve-year-old tank with rust at its base and rusty hot water is usually money spent delaying a replacement. And if the tank body itself is leaking, there is no repair on either branch — a pressurised, glass-lined tank cannot be patched.
When to call a professional
Call a licensed plumber or gas technician — and for a gas smell or a house-wide gas failure, the gas company first, from outside — if any of these apply: you smell gas at any point; the pilot dies on release after one correct relight with the full 60-second hold (Branch A — sensor, switch or valve testing follows); the pilot dies again hours or a day later after the intake has been cleaned (Branch B — venting, pressure or valve follows); the flame is yellow, lazy or sooty, or there is soot around the burner; the status light shows a repeating fault pattern such as 2 flashes (low thermopile output) or 4 flashes (high-limit trip); the burner never fires with the pilot lit; other gas appliances are also failing (gas utility first); or the tank leaks or the heater is past roughly 10 years old with repeated pilot failures. Telling the technician your branch — “dies the second I release it, full hold, strong blue flame” or “holds fine, dies after the evening heating cycle” — plus any flash code is genuinely useful: it is the manufacturers’ own test, already run.
Frequently asked questions
Why does my pilot light go out as soon as I release the button? Because the thermocouple or thermopile is not holding the gas valve open on its own — Branch A above. First rule out the free causes in the test order: you released before a full 30–60 seconds, the flame is not wrapping the top 3/8 to 1/2 inch of the tip, or the valve connection is loose (finger-tight plus a quarter turn). Only then is it a weak sensor, a tripped thermal switch or ECO in the circuit, or the valve’s magnet — confirmed by the millivolt test, not by guessing.
Why does my pilot light go out hours later, or every few days? Because something changes after a successful relight — Branch B. The maker charts for a pilot that goes out periodically name insufficient combustion air (a lint-clogged intake or flame arrestor), an incorrect or clogged vent system, and inconsistent gas supply or pressure. Note what else was happening when it died — heating cycle, wind, garage door, dryer or exhaust fan — because that pattern is the clue.
How many millivolts should a thermocouple read? On the test in American Water Heater’s troubleshooting flowchart — leads on the copper body and end terminal, pilot held lit — 12 millivolts DC or more after 45 seconds passes; a healthy thermocouple typically makes about 25–30 millivolts open-circuit. Do not apply those numbers to a thermopile: on newer electronic controls the sensor output is in the hundreds of millivolts, and the status light (2 flashes = low output) is the first readout.
How long should I hold the pilot button, and how long should I wait before relighting? Hold 30–60 seconds after the flame lights (about a minute in American’s steps; allow up to 90 seconds for an A. O. Smith status light to start blinking). Before relighting, A. O. Smith says turn the gas off and wait at least 10 minutes — and your own heater’s label overrides any general figure, because makers print different waits.
Can I just keep relighting it? One correct relight-and-watch is diagnosis. Repeated relighting without noting the branch is not — each branch has a cause that will keep winning, a yellow or sooty flame should not be relit at all, and if you smell gas at any point the only correct move is to leave and call the gas company from outside.
Does gas keep flowing after the pilot goes out? No — on a working heater that is the sensor’s whole job. When the flame dies, the thermocouple or thermopile cools, its voltage falls, and the gas valve shuts off gas to the pilot and the main burner. If you smell gas anyway, treat it as a leak, not a pilot problem: leave and call from outside.
This article is general information based on the A. O. Smith, American Water Heater, Bradford White and Rheem manufacturer sources linked and cited above and checked in November 2026. Controls, valves, waiting times and codes vary by maker and model — follow the lighting instructions and warnings printed on your own heater first, never defeat a safety sensor or relief valve, and use a licensed professional for gas components, sealed-burner work and millivolt testing.