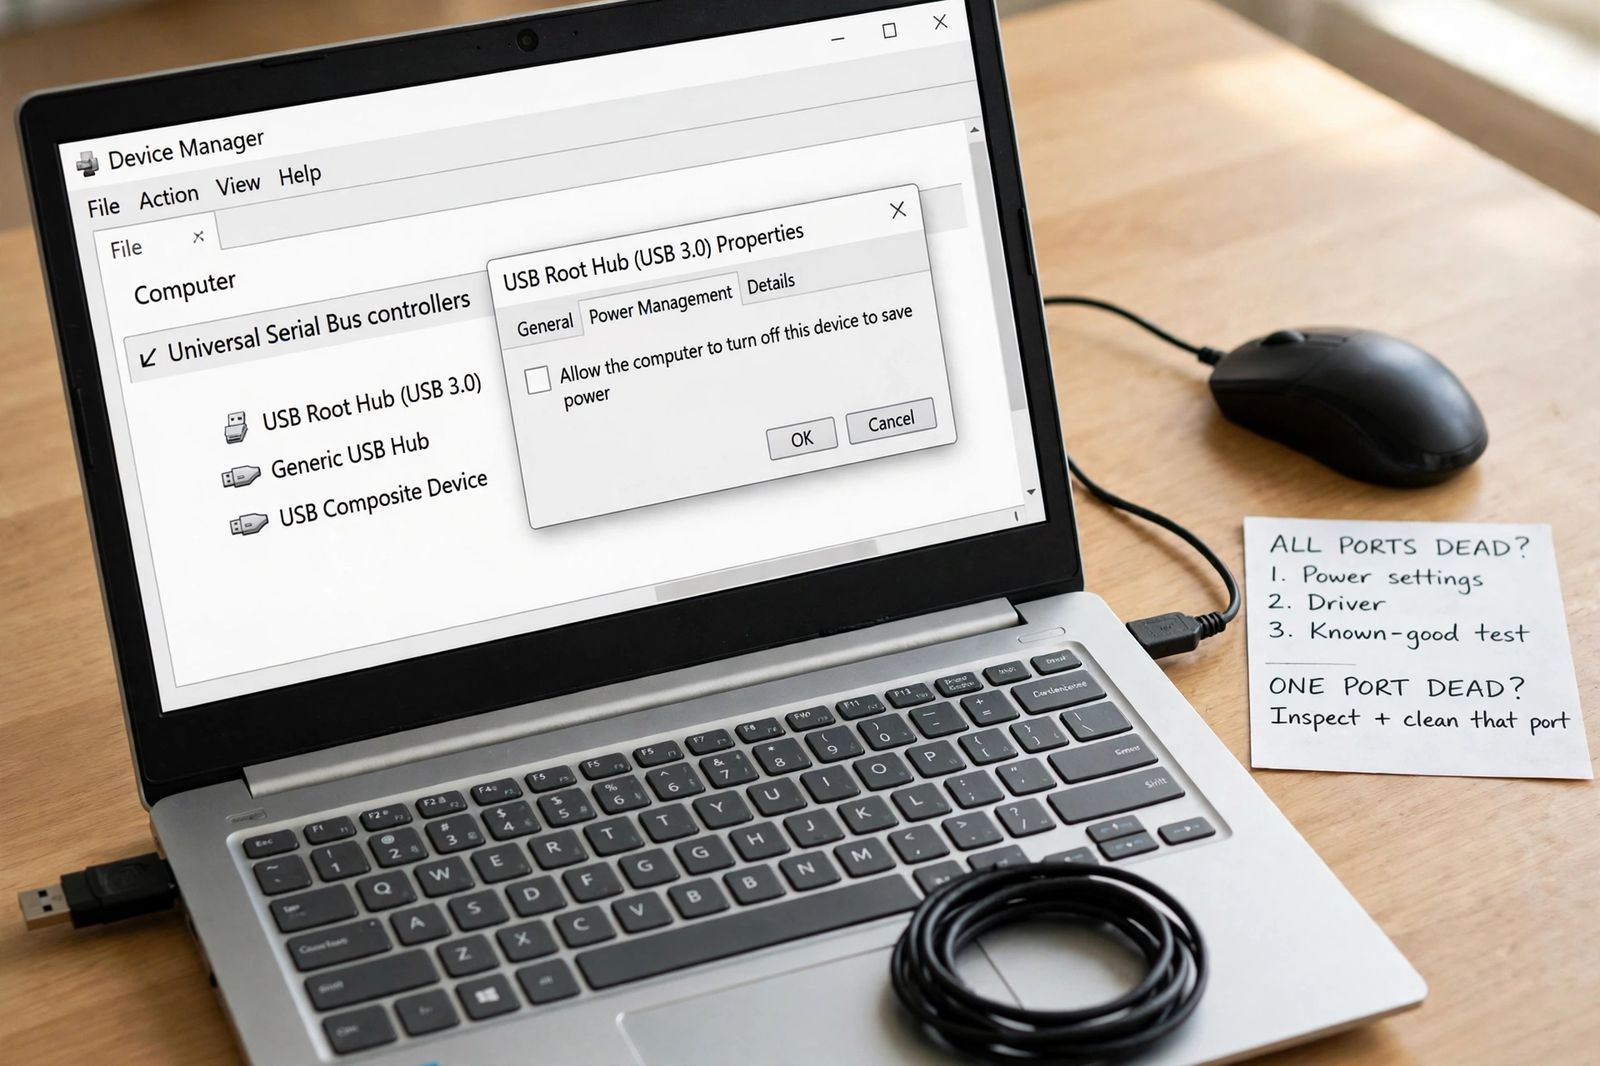
When USB ports stop working, the first question is not which setting to change — it is how many ports are dead. Plug one device you know works — a wired mouse, or a flash drive that worked this week — into every port in turn. If it works in some ports and not in one, that one port is the fault: dirt, bent contacts or physical damage in that socket, and no Windows setting will repair it. If the same known-good device is dead in every port, the ports themselves are almost never all broken at once — the fault sits above them, in Windows power management, the USB driver and controller, or the firmware, and the fix order is power settings first, then the driver, then the full known-good test sequence below to prove what is left. And if every device you own fails in every port here but the same device works on another computer, your computer has told you the same thing a second way. Start with that split, work only your side of it, and do not uninstall drivers for a port that has lint in it — or clean a port whose real problem is that Windows put it to sleep.
Step 1: Run the split — one device, every port, two minutes
You need one device you trust. Not the device that first failed — that one is a suspect, not a witness. A basic wired mouse is ideal because it answers instantly with light and movement and needs almost no power; a flash drive you used recently is second best. Unplug everything else USB — hubs, docks, drives, printers — so nothing else can confuse the result, connect the computer to mains power if it is a laptop, and then plug the trusted device into each port, one at a time, giving each port a few seconds. Write the result down port by port. The photograph at the top of this article is exactly this setup: the trusted mouse in one port, a flash drive ready for the next, Device Manager open behind, and the test card beside the laptop so the order is not left to memory.
| What the split shows | What it usually means | Your path |
|---|---|---|
| One port dead — the trusted device works in every other port | A port-specific fault: lint or debris in that socket, bent or flattened contacts, a loose or cracked socket, or (on a desktop) that port’s internal cable | The one-port path below: inspect, clean, prove, then repair or work around |
| All ports dead — the trusted device works nowhere on this computer | A shared fault above the ports: USB selective suspend and hub power management, a failed USB controller driver, ports disabled in firmware, or a controller stuck after sleep or a power event | The all-ports path below, in its order: power settings, then driver, then the known-good test sequence |
| One device dead everywhere — other devices work in the same ports | The device or its cable, not the computer. The ports are proving themselves with every device that does work | Test that device on another computer, try its cable swapped, and stop working on this PC |
| Desktop front ports dead, rear ports fine | The front panel’s internal USB cable or its motherboard header — the rear ports are on a different connection entirely | Reseat the front-panel cable inside the case (desktop, power off), or use the rear ports |
| Ports work, then drop out after sleep or idle minutes | The classic power-management pattern: a port is suspended and does not wake cleanly | Go straight to the power-settings step of the all-ports path — it was written for this pattern |
| A “Power surge on the USB port” or “USB device might need more power” message | A device drawing more than the port can give, a short in a device or cable, or an unpowered hub loaded with drives | Unplug everything, restart, add devices back one at a time directly to the computer; the device that brings the message back is the cause |
Two readings sharpen the split before you change anything. Does the dead device at least get power — a light, a charge symbol, a spinning drive? Power but no data points at the driver, the controller or the port’s data contacts; no power at all points at the port’s power contacts, power management, or a controller that never woke up. When did it start? Ports that died the day of a Windows update, a driver install or a move of the computer each have a prime suspect, and a failure that began with one device being plugged in — and took the rest of the ports with it — is often that device shorting or overloading the shared controller, which is why everything else was unplugged for the test.
If your split is one port: the physical path
A single dead port with healthy neighbours is a local, physical story in almost every case, and the work is eyes and patience, not settings.
Inspect it properly
Shut the laptop down or put it to sleep, take a torch — a phone light held at an angle works well — and look into the socket. You are looking for four things: packed lint or dust (the commonest find, especially on a laptop that lives in bags), a contact that is bent flat or pushed back compared with its neighbours, a plastic tongue in the middle of a USB-A socket that is cracked or missing, and any green or white corrosion. Compare with the working port next to it; a healthy socket is the reference. A port where plugs now sit loose, wobble, or only work when held at an angle or pressed down is telling you its contacts or its solder joints are worn — cleaning will not restore spring or solder, and that reading is the repair-or-workaround decision made early. If the port is warm with nothing in it, smells burnt, or has ever sparked, stop: unplug the machine and have it looked at rather than testing it further.
Clean it — dry, soft, and gently
Power the machine off. Blow the port out with compressed air in short bursts, can upright. Lift packed lint out with a dry, soft, non-metal tool — a wooden or plastic toothpick used gently, never a pin, paperclip or anything metal, and never force: the contacts you are trying to save bend under exactly the pressure an impatient clean applies. No liquids in the port. Then power on and re-run the split test on that port alone. Lint removal reviving a “dead” port outright is common enough that this step, done before any driver work, is what separates a two-minute fix from an afternoon of settings archaeology.
The port is clean and still dead
Work through what remains, in this order. First, rule out the half of the port you cannot see: on a desktop, front-panel ports connect to the motherboard by an internal cable, and a cable walked partly off its header after a move or a clean kills those ports while the rear ports — soldered to the board itself — keep working; reseating that cable, power off and unplugged, is the one internal step worth taking. On a laptop, there is no equivalent cable for you to reseat; the port is part of the board or a small side board. Second, check whether the failure is really port-shaped at all: if a USB-C device fails in a USB-C port, remember that USB-C is a socket shape, not a promise — not every USB-C port carries video, Thunderbolt or full power, and not every USB-C cable carries every feature either, so test the port with a plain data device (the trusted mouse or drive, through an adapter if needed) before condemning it. Third, run the maker’s own port test if your brand offers one: HP laptops carry a USB Port test in HP PC Hardware Diagnostics — restart, tap Esc, then F2, then Component Tests > USB Port — and Dell offers a USB diagnostics check through its support tools; a port that fails the maker’s test, outside Windows, has given you the evidence for a warranty or repair conversation.
A single port that stays dead after a clean, with a trusted device, is a hardware repair: on a desktop with a spare slot, an inexpensive USB expansion card or simply using the rear ports is usually the rational answer; on a laptop, a small hub in a working port replaces the dead one for desk use at a fraction of a board repair. Live with the workaround knowingly rather than paying board money for one socket — unless the dead port is the laptop’s charging USB-C port, in which case it is urgent, because a flat battery turns a one-port problem into a no-computer problem.
If your split is all ports: power first, then driver, then proof
All ports failing together is a shared-systems failure, and it has an order. The order matters because each step is cheaper and more likely than the next for this pattern, and because skipping to driver surgery first — the most common wrong turn in the guides for this problem — destroys the evidence of which step actually fixed it. Change one thing, re-run the split test, and stop when the ports return.
Before step 1, do the plain restart properly: choose Restart, not Shut down. With Fast Startup on, a shutdown keeps part of the old session — including a stuck controller state — and starts from it, while Restart is a full fresh boot. If the ports died around sleep, a dock or a flat battery, also do a full power drain once: shut down, unplug the charger and every USB device, hold the power button for about 15 seconds, then plug the charger back in and start. HP documents the same power-reset idea for exactly this stuck-hardware state, and it costs two minutes.
Step 1: Power settings — selective suspend and hub power management, as a test
Windows can put an idle USB port into a low-power state and, on some machines, fails to bring it back — the port then looks dead until something resets it. There are two switches, and for an all-ports failure you test both.
USB selective suspend is the power-plan switch. Microsoft’s own driver documentation defines it precisely: the feature allows the hub driver to suspend an individual port without affecting the other ports on the hub. To test it: open Edit power plan from Start search, choose Change advanced power settings, expand USB settings > USB selective suspend setting, and set it to Disabled — on a laptop, for both On battery and Plugged in. Apply, restart, and re-run the split.
Hub power management is the per-hub switch, and it lives somewhere else: in Device Manager, expand Universal Serial Bus controllers, open each USB Root Hub entry’s Properties, go to the Power Management tab, and clear Allow the computer to turn off this device to save power. Microsoft’s Q&A guidance for “none of my USB ports are working” gives this same step — uncheck the box on every USB Root Hub listed. Restart and re-test.
Now the correction, because most of the top guides for this problem get it wrong in the same direction: disabling selective suspend is a test, not a permanent fix — and Microsoft says so about its own feature. The same Microsoft documentation states that selective suspend is enabled by default and that Microsoft strongly recommends not disabling it. A device that never suspends keeps the USB controller active and can stop the processor reaching its deeper idle states, which is real battery life on a laptop. So: if disabling it brings your ports back, you have found the area of the fault — a power-state interaction, most often cured properly by the updated chipset driver in step 2 — and you can then try re-enabling it after that driver update to see whether the fault has actually gone. If disabling it changed nothing, set it back to Enabled and move on; leaving it off “just in case” buys nothing and costs battery on every machine that does it. Guides that present “disable selective suspend” as the final step, with no restore instruction, are leaving every reader’s laptop slightly worse forever to diagnose a fault half of them do not have. One boundary: on some newer laptops using Modern Standby the selective-suspend option does not appear in the power plan at all. If it is not there, do not edit the registry to force it to appear — work the hub Power Management tab above and step 2 instead.
Step 2: The driver — reinstall the controllers, get the chipset from the maker
If power was not it, the USB driver stack is next. Start by reading it before changing it: in Device Manager > Universal Serial Bus controllers, a yellow warning triangle on a hub or controller entry, or an Unknown USB Device entry carrying an error such as “Device Descriptor Request Failed”, is Windows naming the layer that failed. Note which entry carries the mark.
The reinstall itself is a clean reset, not a hunt for a newer file:
- In Device Manager, expand Universal Serial Bus controllers.
- Right-click each USB Root Hub and host controller entry and choose Uninstall device. Work from the bottom of the list up; your USB mouse and keyboard will stop responding as their hub goes — that is expected, and on a laptop the touchpad and built-in keyboard still work. If every input is USB, the restart in the next step can be triggered with the power button.
- Restart the computer. Windows detects the controllers and reinstalls their drivers automatically during start-up — the same sequence Dell and Microsoft both document.
- Re-run the split test.
If the ports return and then fail again days later, or failed from the day of an update, the generic Windows driver is not the whole story: install the chipset driver — the package that owns how the controller handles power and wake states — from your PC or motherboard maker’s support page for your exact model, and check Settings > Windows Update > Advanced options > Optional updates for driver offers there. Dell’s USB guide routes its own owners the same way, through SupportAssist and driver-and-BIOS updates, and adds the firmware check in step 3 below. Drivers come from Windows Update or the maker — never from a third-party “driver updater” program, several of which advertise on the very pages that rank for this problem.
Step 3: The known-good test sequence — prove what is left
If power settings and a clean driver reinstall have not revived the ports, stop changing settings and start proving, because the remaining suspects — firmware and hardware — are decided by tests, not by more Windows steps. Run these three in order; each result halves what is left.
- The cross test. Take the trusted device to another computer and confirm it still works there (you are re-proving your witness), then take a second known-good device — a different mouse or drive, ideally with a different cable — and try it in this computer’s ports. Two different trusted devices dead in every port, both proven working elsewhere, clears the devices and cables completely: the fault is this computer, full stop.
- The firmware test. Restart and use the ports before Windows loads: a USB keyboard that can open and navigate the firmware setup screen (F2 or Del on most desktops, F2 on Dell, Esc then F10 on HP), or that works in the maker’s pre-Windows diagnostics, is a keyboard the hardware can see. Ports alive in firmware but dead in Windows means the hardware is healthy and the fault is still in Windows — go back to step 2 with the chipset package and any update that landed the day the ports died. Ports dead in firmware too means Windows was never the problem. While you are in the firmware, check that USB is not simply switched off: Dell’s guide gives the shape — F2 at start-up, USB Configuration under Integrated Devices, with Enable USB Ports / Enable External USB Ports checked — and other makers bury the same switch under similar names (USB Ports, XHCI Hand-off, Legacy USB Support). A firmware update, a reset to defaults or another user can leave ports disabled there, and no Windows step can override it.
- The maker’s diagnostic. Run the test the maker built for exactly this: on HP machines, Esc then F2 for HP PC Hardware Diagnostics and Component Tests > USB Port, which tests ports individually outside Windows and issues a failure ID you can hand to support; on Dell machines, F12 at the logo for Diagnostics, or Dell’s USB port diagnostic through its support site. A port or controller that fails the maker’s own test is a hardware result, not an opinion.
Read the three results together: alive in firmware, dead in Windows is a Windows problem that step 2 owns; dead everywhere including firmware, with firmware USB enabled, is the controller or board — a warranty or repair conversation, with the diagnostic failure ID as your evidence. And note what this sequence prevents: reinstalling Windows, which some guides reach for at this point, cannot repair a controller, a firmware switch or a power circuit, and every test above runs without touching your files.
Two neighbours of this fault are worth separating while you test. If the computer produces no picture at all while you try to reach the firmware screens, the dead thing is in the display chain rather than the USB chain, and monitor no signal works that chain link by link in its own order. And if the machine reaches the firmware screens with a USB keyboard but, once Windows loads, only some of that keyboard’s keys respond, the ports have cleared themselves — that failure is read by its dead-key pattern in some keyboard keys not working.
The device-side case: everything fails, but only for one device
The third row of the split table deserves its own short section because it is the one most often misdiagnosed as a port failure. If other devices work in the same ports, your ports, controller and drivers have all just passed a live test — the fault belongs to the one device or its cable. Prove it on another computer, swap its cable (on USB-C especially, where cables differ in what they carry), and connect it directly rather than through the hub or dock it arrived on, because an unpowered hub running several devices is a power shortage wearing a port failure’s clothes. A device that gets power — light on, charging — but never appears has usually failed in its own electronics or its connector, and a second computer showing the identical behaviour is the confirmation.
One special case hides here: a flash drive or external drive that is detected — it appears in Device Manager, it makes the connection sound — but never shows in File Explorer is not a dead port at all. Windows has seen the drive and not given it a letter; Disk Management shows it, and assigning a drive letter there is the fix. Work that as a drive problem, not a port problem, and do not format anything Disk Management offers to format until your files are safe elsewhere.
If the device in question is a wireless mouse’s receiver, the same logic applies with one extra turn: the receiver is the device, so test it in another port and another computer first — and if the receiver proves healthy but the mouse still will not move, the fault has moved to the mouse’s own link, which is worked by connection type in wireless mouse not working.
Three claims to be careful with
- “Disable USB selective suspend” as a finished fix. Covered in step 1 because it is the most repeated: Microsoft enables the feature by default and strongly recommends not disabling it. Disable it to test, restore it when the test says no, and treat a test that “works” as a signpost to the chipset driver — not as the cure to leave in place.
- “Run the Hardware and Devices troubleshooter.” Several current guides — including a large recovery-software guide in the top results — still give this as an early step. On current Windows 11 there is no general hardware or USB troubleshooter to run: Microsoft retired the legacy MSDT troubleshooters, and the Get Help app that replaced some of them carries no general USB troubleshooter. If you follow an older guide looking for it, nothing is wrong with your PC; the tool was removed from the product. The Device Manager and power-plan steps in this article are the supported route that remains.
- “Uninstall everything and restart” as step one. The controller reinstall in step 2 is a real fix — in its place. Done first, before the split and before the power test, it costs you your USB keyboard and mouse mid-procedure, resets ports that were never the problem, and leaves you unable to say what was wrong. Order is not pedantry here; it is what makes the result mean something.
When to stop and hand it over
Stop testing and go to the maker’s warranty service or a repair shop when any of these is true: the maker’s pre-Windows USB test fails a port or the controller — take the failure ID with you; the ports are dead in the firmware screens as well as in Windows, with USB confirmed enabled in the firmware settings, after a power drain and a driver reinstall; a port is physically damaged, loose to the point of disconnecting at a touch, warm with nothing plugged in, or carries any sign of burning; or the dead ports include a laptop’s only charging port and the battery is running down — that one is urgent for the practical reason given earlier. On an older desktop, weigh the repair honestly: a USB expansion card is a cheap, legitimate full fix for dead rear ports, and a powered hub in a surviving port covers most desk needs. What does not justify a repair bill: ports that fail the split on this computer but whose trusted devices all work elsewhere and which come back in the firmware test — that machine needs Windows work, not parts.
Frequently asked questions
Why are my USB ports not working all of a sudden? Read the split first. All ports together usually means a shared cause arrived suddenly: Windows suspended the ports and did not wake them (often after sleep), an update changed the USB or chipset driver that day, the controller stuck after a power event or a flat battery, or one plugged-in device overloaded or shorted the shared controller — which is why the split test unplugs everything else. One port alone is usually the port itself: something got into it, or it took a knock.
Why does one USB port not work but the others do? Because that port has its own physical path and it has failed locally — packed lint, a bent or flattened contact, a cracked socket tongue, or, for a desktop’s front ports, the internal cable to that panel. The rest of the system proves itself every time another port works. Inspect and clean that port, prove it with a device that works in the neighbouring port, and treat a port that only works when the plug is held at an angle as worn hardware.
Should I disable USB selective suspend permanently? No. Microsoft’s driver documentation says the feature is enabled by default and strongly recommends not disabling it, because a port that never suspends can keep the controller active and stop the processor reaching deeper idle states, costing battery. Disable it as a diagnostic test when ports fail after idle or sleep; if it makes no difference, turn it back on, and if it does make a difference, update the chipset driver from your maker’s site and then try re-enabling it.
How do I reset my USB ports on Windows 11? The real reset is the controller reinstall: Device Manager > Universal Serial Bus controllers, uninstall each USB Root Hub and host controller, then Restart — Windows reinstalls them on start-up. Do it as step 2 of the all-ports path, after the split and the power-settings test, not as a first move, and use Restart rather than Shut down so Fast Startup does not preserve the stuck state you are trying to clear.
Can a USB port just wear out? Yes — a single one can. Its contacts lose spring, its socket loosens, or its solder joints crack, and the tells are a plug that wobbles, a device that connects only at an angle, and a port that fails with every proven device while its neighbours work. That is a repair, a replacement port or card, or a hub in a working port — no setting reaches it.
My USB device lights up but the computer does not see it. Is the port dead? Not necessarily — the light proves the port is delivering power, so the power side of that port works. The failure is in data: that device, its cable, the driver entry for it, or the port’s data contacts. Test the device in a second port and on another computer, and check Device Manager for it appearing with a warning mark or as an Unknown USB Device; the pattern of those three tells you which side of the cable the fault is on.
This article is general information, based on the Microsoft Learn USB selective suspend documentation, Microsoft Q&A and Dell Support USB guidance linked above, with HP’s pre-Windows USB Port diagnostics, and checked in November 2026. Menu names, firmware keys and diagnostic routes vary by model — your PC maker’s support page for your exact model is the authority for its steps. If a port is warm, smells burnt or has sparked, stop testing it and get hands-on help.