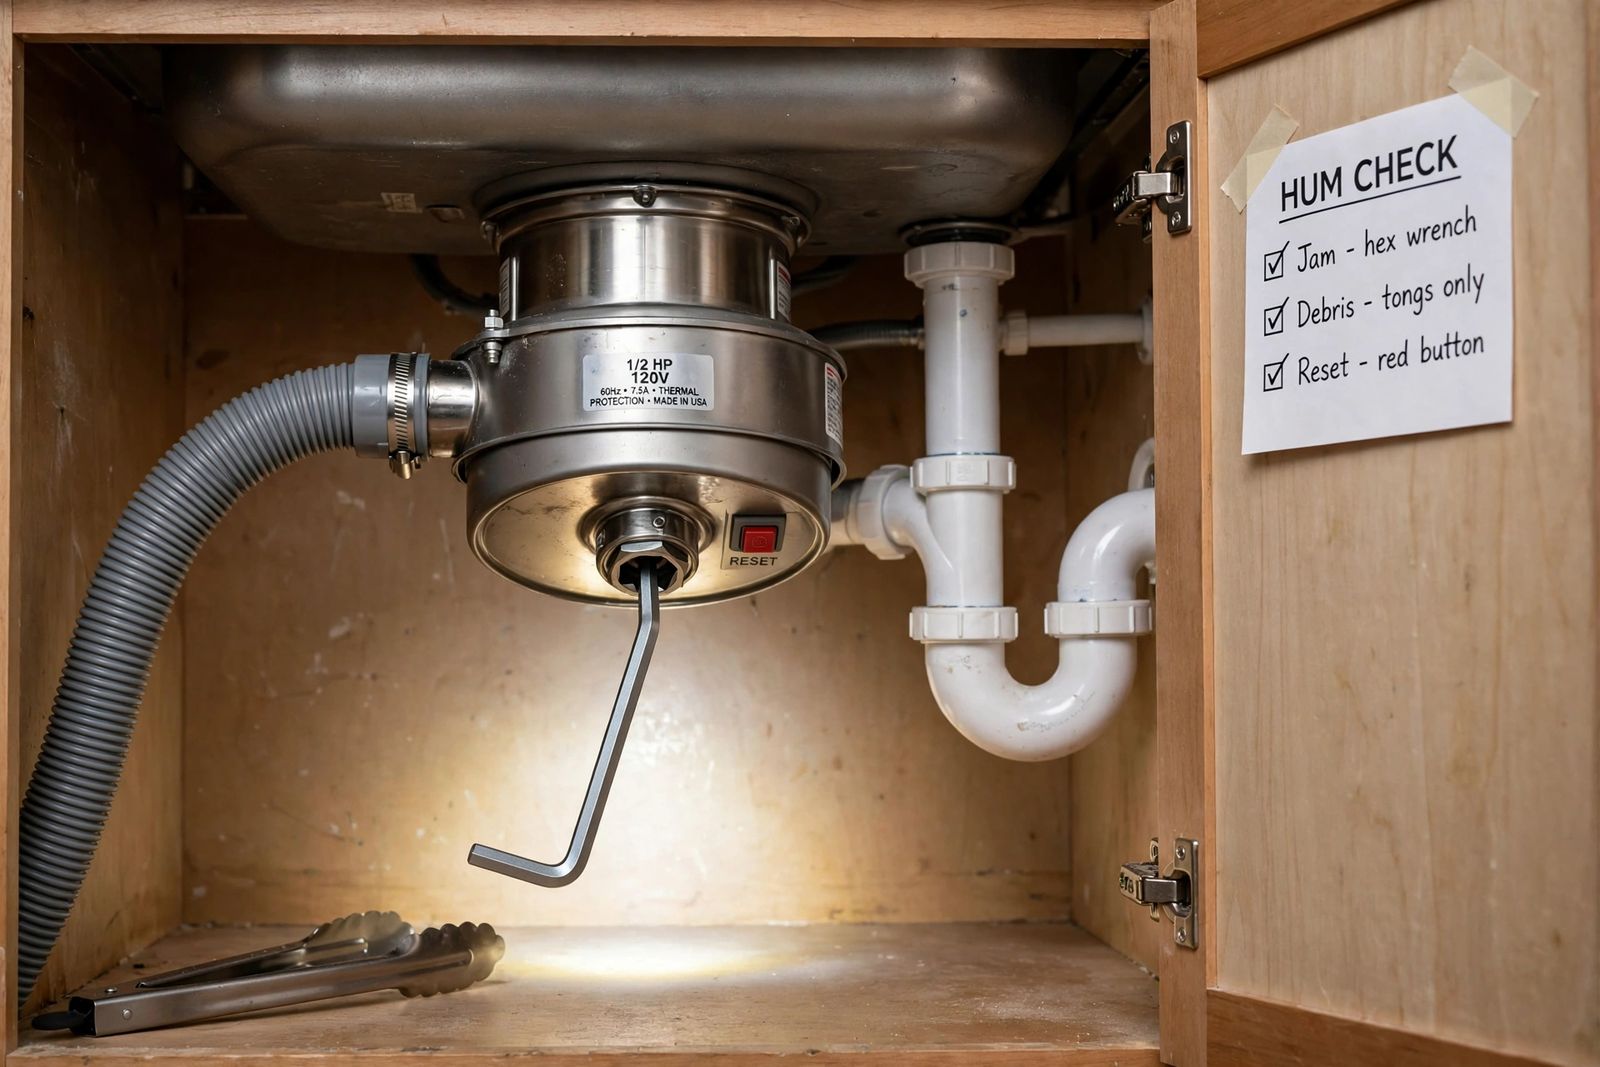
A humming garbage disposal is not dead — it is stuck. The hum means power is reaching the motor, but the flywheel cannot turn. In most cases something hard — a fruit pit, a bone fragment, a bottle cap, a stray spoon — is wedged between the flywheel and the grind ring, and the fix is mechanical, not electrical: switch the power off, check for the obstruction with tongs or pliers (never a hand), work the flywheel free with a hex wrench in the socket underneath the unit, then press the red reset button, in that order. If the flywheel turns completely freely by hand and the disposal still only hums, the jam is not the problem — the motor bearing has seized or the start system has failed, and that unit is replaced, not repaired. Switch a humming disposal off within seconds: a stalled motor overheats fast, and leaving it humming is how a free fix becomes a burned-out motor.
First: stop the hum, and make it safe
The moment you hear the hum instead of grinding, turn the wall switch off — within two or three seconds. A motor that is energized but cannot rotate draws far more current than a spinning one and heats up quickly. Most disposals protect themselves with a built-in overload protector that trips and cuts power, which is why a disposal often hums for a few seconds and then goes silent on its own. That silence is the protector doing its job, not the problem fixing itself, and it is also your warning: one more long attempt can cook a motor that was perfectly healthy before the jam.
Then, before any tool goes anywhere near the unit:
- Power off twice, not once. Wall switch off, and unplug the unit under the sink — or, if it is hardwired, switch its breaker off at the panel. The wall switch alone is not enough for hands-under-the-unit work: switches get bumped, and other people flip them.
- Never put a hand into the grinding chamber — for this or any other fault, even with the power off. InSinkErator’s own guidance is absolute on this point: do not put your hand in the disposal at any time. The impellers are sharp, hidden objects are sharper, and a jammed flywheel under tension can shift suddenly when it lets go. Anything that has to come out comes out with tongs or needle-nose pliers.
- Let a tripped motor cool. If the unit hummed and then went silent, the overload has tripped and the motor is hot. It needs about 10 minutes before the reset button will even stay in — the exact timing matters, and it is covered in the fix order below.
- If the sink is full of water, let it drain, or bail it into a bucket, before you start looking down the drain. You need to see the chamber, and you do not need a sinkful of dirty water above a unit you are about to work under.
Do not pour chemical drain cleaner into a humming disposal at any point in this job. The fault is a solid object wedged in metal, not a grease clog a chemical can dissolve — and cleaner sitting in the chamber is a splash hazard the moment the flywheel breaks free and spins.
The hum diagnosis: jam, bearing, or electrics
A hum is one symptom with three different verdicts, and they are separated by a single test you will do during the fix: how the flywheel behaves when you turn it by hand with the hex wrench. Read the table now so you know what the test is telling you while you do it.
| What you find | The confirming test | Most likely cause | Verdict |
|---|---|---|---|
| Hums, nothing spins, and the hex wrench meets hard resistance — it rocks a little, then locks | Work the wrench back and forth: resistance is solid in both directions, then suddenly releases | Jammed flywheel. A hard object (pit, bone, cap, twist tie, silverware) wedged between an impeller and the grind ring — or, after weeks of disuse, corrosion and packed food holding the plate | Repair — free. Follow the safe fix order below; remove the object with tongs; this is the common case |
| Hums, the wrench turns — but grittily, stiffly, or not at all even with steady force | The plate never reaches a free, smooth full circle in both directions, however patiently you work it | Seized bearing / seized plate. The motor’s bearing or the plate itself has bound up — age, corrosion after long disuse, or internal damage | Replace. A seized bearing is inside the sealed motor; it is not a part you can free, lubricate or swap from under the sink. If it will not turn by hand, it will not turn under power |
| Hums, and the wrench spins the flywheel freely — smooth full circles both ways — yet the disposal still will not start | Flywheel provably free + motor cooled + reset pressed and staying in + power confirmed at the switch/outlet — and it still only hums | Electrical / start fault. The start system that gives the motor its initial kick has failed, or the motor windings themselves are failing. The motor has power but no ability to start turning | Replace (home models). The start components are internal and are not sold as a homeowner service part on ordinary disposals. A newer premium unit may justify a professional diagnosis first; a standard unit does not |
| No hum at all — complete silence | — | Not this fault. No power is reaching the motor: tripped overload with no hum, tripped breaker or GFCI outlet, loose plug at the switched under-sink outlet, failed switch | Different path. Reset button, outlet, breaker and plug first — in that order — before condemning anything |
| Hums, then clicks off by itself | It repeats the pattern after cooling and resetting, even with the flywheel freed | Overload tripping on a still-present fault — a partial jam the wrench did not fully clear, or a motor overheating because it is failing | One more careful pass through the fix order; if it trips again with a provably free flywheel, it belongs to the bearing/electrical rows above: replace |
No page in the thin set ranking for this keyword puts this on one table. The local plumber pages list causes in prose and end at a phone number, the Q&A answer offers “jammed or self-destructed” as the two options, and the strongest guide spreads the same verdicts across three separate “methods” and an FAQ where the reader has to assemble them. The table is the article; the sections below are each row explained, in the order you will actually meet them.
The safe fix order
Order is not a nicety here — it is the difference between the fix working and the fix wasting itself. InSinkErator’s own jam-clearing guidance runs in one sequence, and every step below follows it. Do not reorder it, and in particular do not press the reset button first: at least one widely read fix guide in the ranking set makes “find the reset button” its Step 1, before the jam is freed. Resetting a disposal that is still jammed simply re-energises a stalled motor the next time the switch is flipped — the protector trips again, the motor heats again, and the reader concludes the unit is dead when all that happened was the steps were backwards. The reset is step 4 of 5, after the jam is cleared, for a reason.
Step 1 — Power off at the switch and the breaker. Wall switch off. Unplug the unit under the sink, or switch its breaker off if it is hardwired. If the sink is full, let it drain or bail it out. Everything below happens with the power off.
Step 2 — Check for the obstruction, with tongs or pliers — never a hand. Shine a flashlight down the drain and look, paying special attention to the outer edge of the chamber, where objects lodge against the grind ring. If you can see the object — a pit, a cap, a spoon, a shard of bone — lift it out with tongs or needle-nose pliers. If it is wedged too tightly to lift, leave it for step 3 to loosen; do not dig at it. If you see nothing, the jam may be below the plate or made of packed fibrous food (celery strings, onion skins, corn husks wrap the impellers and set hard), and the wrench still clears most of those.
Step 3 — Turn the flywheel with the hex wrench, from underneath. Get under the sink and find the hex-shaped socket in the centre of the bottom of the unit, facing the floor. Every InSinkErator is supplied with a small self-service wrench for exactly this hole — silver, crank-shaped, about four inches long, often taped to the unit or lost in the cabinet. A standard 1/4-inch Allen (hex) wrench is the same tool. Insert it fully and work it back and forth like a crank, with steady force. InSinkErator is explicit that force is acceptable: the wrench is designed to bend before the disposal is damaged. Keep working until the flywheel spins freely in complete circles in both directions — not just rocks, not just moves a little. A plate freed “a bit” re-jams the instant power returns. Once it turns freely, look down the drain again with the flashlight and remove whatever the wrench loosened, with tongs or pliers, before any power comes back on. That second look is part of the step, not an optional extra: one ranking guide buries debris removal after its power-restore test, which means running the unit with the loosened object still inside it.
Step 4 — Press the red reset button. The overload protector sits on the bottom of the unit, facing the floor: a small square red button. If it tripped, you will see it has dropped down about 1/4 inch (5 mm). Gently press it back in. If it will not stay in, wait 10 minutes and try again — that wait is InSinkErator’s own instruction, and it is the step the ranking set most often gets wrong or shortens: one guide tells the reader to wait just “1 to 2 minutes if the motor was hot,” which is not long enough for a stalled motor to cool, so the button pops straight back out and a healthy disposal gets misdiagnosed as dead. Ten minutes, power still off, then press once more. A button that stays in has reset the protector; a button that still will not stay in after a full cool-down, with the flywheel free, is evidence for the diagnosis table’s lower rows, not a reason to keep pressing.
Step 5 — Restore power and test, with cold water. Remove the wrench. Restore the plug or breaker. Run a moderate stream of cold water, then switch the disposal on. It should spin up to its normal grinding sound with no hum. Let it run a few seconds with the water flowing to flush what broke loose, and keep the cold water running for a few seconds after you switch off — that is the makers’ standard operating guidance (cold water, not hot, while grinding; hot water melts grease just long enough for it to coat the chamber and pipes and set there). If it hums again, switch off immediately — within seconds, not after a hopeful half-minute — and repeat from step 3; InSinkErator notes a stubborn jam may need the wrench process repeated several times. If it hums again after the flywheel has been worked completely free and the object removed and a full cool-down and reset, stop: the test has given its answer, and the next section is your row.
If your disposal has no hex socket: some models — many Waste King units and some older disposals — have no bottom turning hole. The makers’ fallback works from above, power off: put a short broom handle down the drain, brace it against one of the impellers, and work the plate back and forth until it turns freely, then remove the object with tongs as usual. One national guide in the set forbids this method outright, which leaves a no-socket owner with no method at all; the hex wrench is the better tool where it exists — better leverage, hands nowhere near the chamber — but the broom handle is the legitimate fallback where it does not, and the same never-a-hand rule applies to both.
Jammed flywheel: the common case, and why it happens
Most humming disposals are this row. The disposal’s motor turns a flat flywheel plate; two swivelling impeller lugs on the plate fling food against a stationary grind ring until the particles are fine enough to wash away. Anything hard that wedges in the gap between a lug and the ring locks the whole plate — and the motor, still receiving power, strains against the lock. That strain is the hum.
The wedging objects are consistent across every guide and the makers’ own material: fruit pits, bone fragments, bottle caps, twist ties, staples and other small metal, dropped silverware, and broken glass. The second jam family is soft but sets hard: fibrous scraps — celery, corn husks, onion skins, artichoke leaves — wrap around the impellers, and starchy waste — rice, pasta, potato peels — packs into a paste that hardens overnight. The third family needs no object at all: a disposal left unused for weeks, in a rental or a vacation home, can seize lightly from corrosion and standing water in the chamber, and hums the first time it is switched on. The wrench clears all three, because all three are the plate being held, not the motor being broken.
Two habits prevent most of it: run cold water before, during and briefly after every grind and feed scraps in gradually rather than dumping a plateful at once, and run the disposal regularly — even briefly, with water — so the plate never sits long enough to bind. And keep the known offenders out in the first place; a disposal is built for the soft scraps left on a plate, not for meal-prep waste.
Seized bearing: the hum the wrench cannot fix
The diagnosis table’s second row is the one to recognise early, because no amount of wrenching changes it. Inside the motor, the shaft rides on bearings. With age, with corrosion from a unit that has sat wet, or after internal damage, a bearing can seize — the shaft itself can no longer rotate, jam or no jam.
The feel through the wrench is the tell. A jam releases: hard resistance, then a sudden give, then increasingly free movement. A seized bearing does not release. The wrench stays gritty, stiff or locked through patient back-and-forth work, and the plate never reaches a smooth full circle in both directions. At that point the test is complete and the verdict is replacement: the bearing is inside the sealed motor housing, it is not freed by lubricant sprayed from outside, not sold as a homeowner replacement part, and not reachable without dismantling the motor. Stop working it, leave the power off, and price the replacement. The same verdict covers the related end-of-life signs that often arrive with it — a metal-on-metal screech once a jam is cleared, jams every few weeks despite careful use, and a housing leaking from the bottom, which means the internal seals have failed alongside everything else; if your unit is doing that as well, garbage disposal leaking works through the leak locations and their verdicts.
Electrical and start faults: free flywheel, still humming
The third row is the subtlest, and it is proven by elimination. You have done the order properly: power off, chamber checked, wrench worked until the flywheel spins freely in complete circles both ways, loosened debris removed with tongs, a full 10-minute cool-down, reset pressed and staying in, power confirmed. You switch on — and it hums, and does not turn.
A flywheel that provably turns by hand rules out every mechanical cause. What remains is the motor’s ability to start itself: the start system that gives a single-phase motor its initial kick, or the windings themselves. When those fail, the motor receives power and produces exactly what you are hearing — a hum with no rotation. There is no homeowner repair for this on ordinary disposals: the components are internal, they are not a service part you can buy and swap from under the sink, and opening the motor housing is not a DIY job. For a standard unit, the verdict is replacement. The honest qualification is age and class: on a newer, higher-end unit still under warranty, a professional diagnosis — InSinkErator’s service route for its own models — is worth taking before you pay for a new unit, because a maker may cover a quality failure. On a unit well into its life, it is not worth a paid electrical repair whose cost approaches the replacement.
Two electrical look-alikes to rule out before you accept this row, both cheap: a tripped GFCI outlet or breaker on the disposal’s circuit (which usually gives silence, not a hum — if the hum is present, power is arriving), and a reset button that was pressed while the motor was still hot and never actually reset (redo step 4 with the full cool-down). Burning smells, scorch marks, smoke, or a breaker that trips the moment the disposal runs are not look-alikes — they end the job on the spot. Power off at the breaker and do not run the unit again; that is a replacement fitted by someone qualified, or a call to an electrician if the fault is in the wiring or switch rather than the unit.
How to tell the motor is dead
Pull the threads together. The motor is dead — and the disposal is replaced, not repaired — when any one of these is true after the full safe order has been done properly:
- The flywheel will not turn freely by hand. Gritty, stiff or locked through the hex wrench, never reaching smooth full circles in both directions: seized bearing or seized plate.
- The flywheel turns freely, the reset stays in after a full 10-minute cool-down, power is confirmed — and it still only hums. Start system or windings have failed.
- The reset button will not stay in after cooling, or trips again on every run with a provably free flywheel: the motor is overheating because it is failing, not because it is jammed.
- Burning smell, smoke, scorch marks, or breaker trips when it runs: stop immediately, power off at the breaker, no further tests.
- It hums alongside a leak from the bottom of the housing: water has crossed the internal seals into the motor. That combination is never a repair.
Age frames the spending decision, and the ranking set’s lifespans cluster around a decade — roughly 8 to 12 years in the strongest guide, 8 to 15 in a local plumber’s FAQ. A dead motor at that age is the expected end of the unit, and replacement money is well spent. The same symptoms on a unit only a few years old point the other way: check the warranty and the maker’s service route before buying anything.
When to call a plumber
- The flywheel will not free after repeated, patient wrench work — do not escalate to forcing it with extensions or cheater bars; a pro can judge whether the unit comes apart or gets replaced.
- You are in the dead-motor rows and are not comfortable disconnecting plumbing and wiring — replacement is a defined, bounded job, and paying for the swap is reasonable.
- Any burning smell, smoke, or breaker tripping, or visible damage, corrosion or looseness in the under-sink wiring. Wet-cabinet electrics are not a DIY area.
- The unit hums and leaks from the bottom at the same time — power off, and treat it as a replacement appointment, not a repair attempt.
- It re-jams within days of a proper clearing with nothing unusual going down the drain — something inside is worn or damaged beyond what the wrench can show you.
Frequently asked questions
Why does my garbage disposal hum but not spin? Because the motor has power but cannot rotate. Usually the flywheel is jammed by a hard object wedged against the grind ring. If the flywheel turns freely by hand with the hex wrench yet it still hums, the cause is inside the motor — a seized bearing or a failed start system — and the unit needs replacing.
How long can I let a garbage disposal hum? Seconds. A stalled motor overheats fast and trips its overload protector, and repeatedly running it jammed can burn out a motor that was fine before the jam. Hear the hum, switch off, and reach for the hex wrench — not the switch, again.
What size hex wrench un-jams a garbage disposal? A 1/4-inch Allen (hex) wrench — the size of the self-service Jam-Buster wrench InSinkErator supplies with its disposals (silver, crank-shaped, about four inches long). Insert it in the hex socket in the centre of the bottom of the unit and work it back and forth until the flywheel spins freely in complete circles in both directions.
I pressed the reset button and it keeps popping out. What now? Stop pressing it and give the motor a full 10 minutes to cool, power off — a hot motor will not reset, and InSinkErator’s instruction for a button that will not stay in is exactly that wait. Clear any jam with the wrench first if you have not already. If it still will not stay in after cooling with the flywheel free, the motor or the protector itself is failing and the unit is heading for replacement.
Can I clear the jam with my hand if the power is off? No. Never put a hand in the grinding chamber, even with the power off and the unit unplugged — the makers state this without exception. The impellers and any hidden object are sharp, and a jammed plate can shift as it releases. Tongs or pliers retrieve objects; the wrench turns the plate; hands do neither job.
My disposal hums, then goes silent. Did it fix itself? No — its overload protector tripped, cutting power to save the overheated motor. The jam is still there. Power off, free the flywheel with the hex wrench, remove the object with tongs, let the motor cool for about 10 minutes, then press the red reset button and test with cold water running.
My disposal makes no sound at all. Is that worse? It is a different fault, not a worse one: silence means no power is reaching the motor — the full diagnosis is garbage disposal not turning on, which works the power path in order. Check the reset button on the bottom of the unit, then whether the under-sink outlet has power (many disposals plug into a switched outlet, and a GFCI on the circuit may have tripped), then the breaker — before assuming the disposal itself has failed.
This article is general information, based on the manufacturer guidance linked above (InSinkErator’s jam-clearing and overload-protector instructions) and the top guides checked in November 2026. Socket, reset and wrench details are given for InSinkErator-type disposals, the dominant design; models without a bottom hex socket use the broom-handle fallback described above, and your unit’s manual governs your model. Work involving hardwired electrical connections, damaged wiring, or a confirmed dead motor you are not equipped to replace belongs to a qualified plumber or appliance technician.