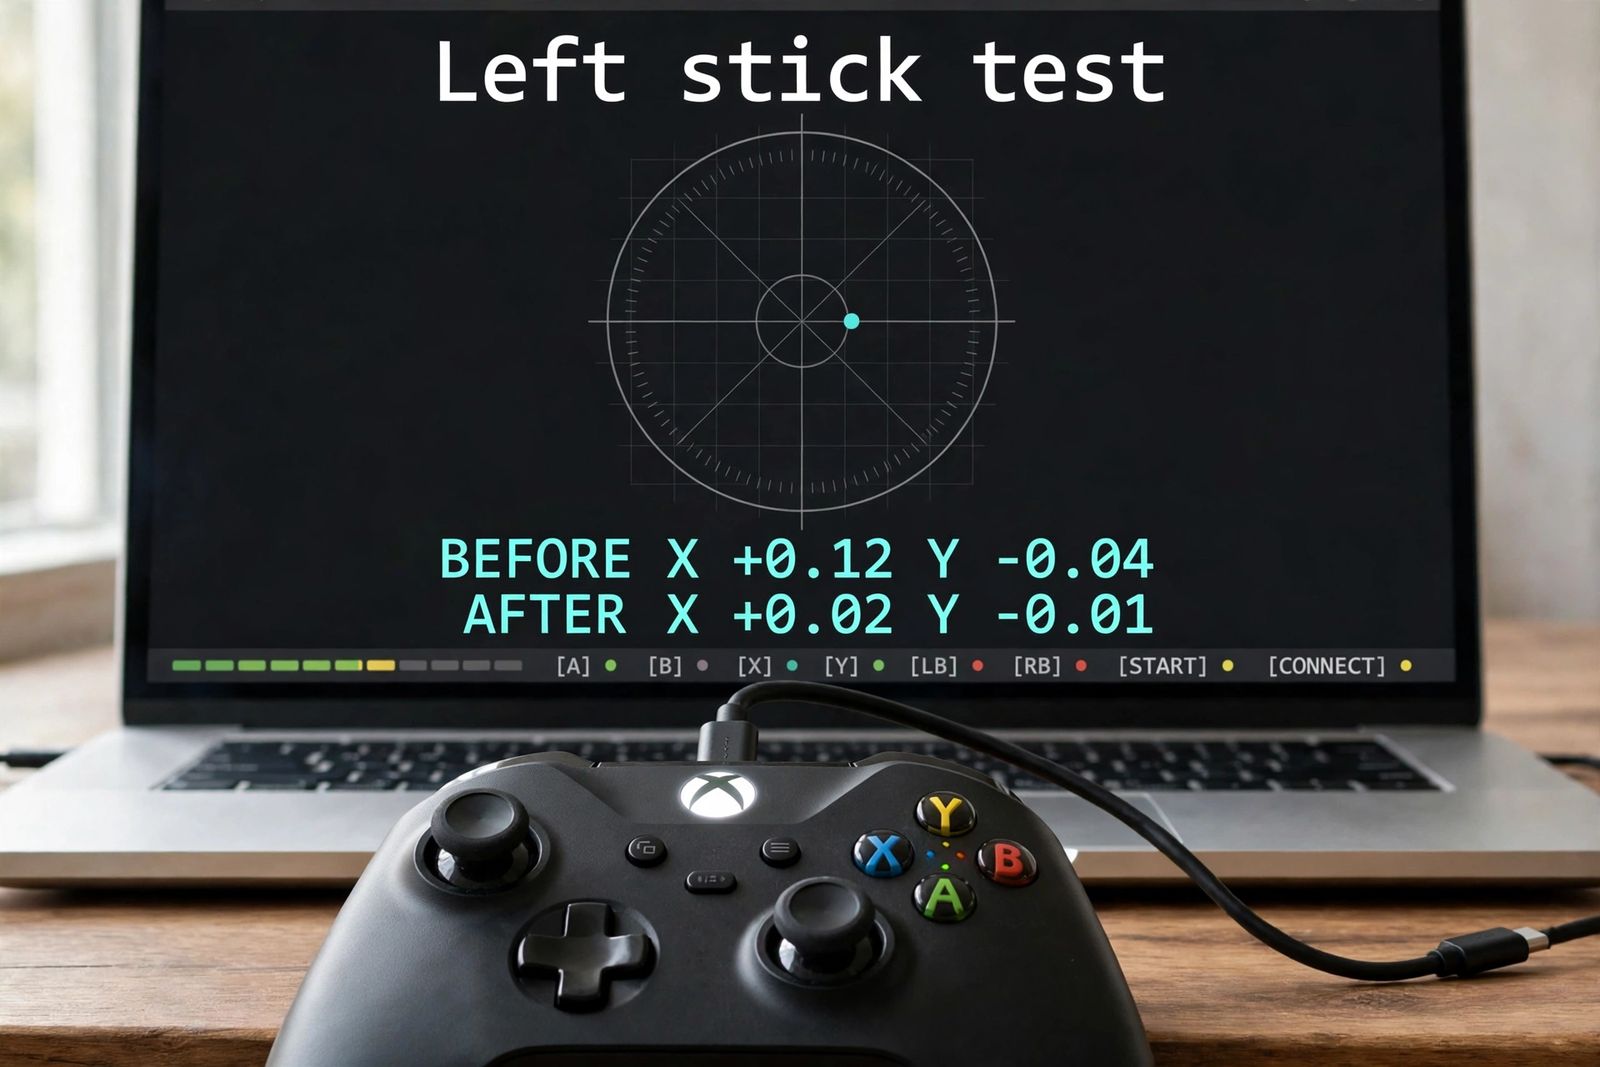
If your Xbox controller has stick drift — the camera turning, the cursor creeping or your character walking with your thumb off the stick — do not start by spraying cleaner into it or by raising a deadzone to hide it. Start with the one fix Microsoft built for exactly this: take a test reading of the resting stick, then run the recalibration tool inside the free Xbox Accessories app, then take the same reading again. Recalibration re-zeroes where the controller thinks “center” is, and the before-and-after reading tells you which problem you actually have: if the offset collapses toward zero and the drift is gone in game, it was a calibration offset and you are done; if the after-reading comes back much the same as the before-reading, the stick’s sensor track is physically worn, and Microsoft itself says its tool cannot fix drift caused by normal wear and tear — no spray, slider or update after that point will either, and the honest routes are a warranty claim, a stick-module replacement, or a new controller. Everything on this page hangs off that sequence, in this order: test reading, recalibration, deadzone for any small remainder, firmware update, a cleaning reality check, and only then the wear verdict. (A controller that will not pair at all is a different fault — our Xbox controller not connecting guide works through the wired test and pairing order for that one.)
First, prove it is the controller — and take the BEFORE reading
Drift has impostors, and two minutes of testing separates them before you change a single setting:
- One game only? If the drift appears in a single game or app and nowhere else — not on the Home screen, not in a second game — Microsoft’s own controller troubleshooting starts here too: check that game’s controller and calibration settings, then close and restart the game. A per-game deadzone set to zero will show movement that every other game hides.
- Everywhere? Drift on the Home screen and in every game is the controller. Drift that follows the controller to a second device — a PC after the console, say — settles it completely.
- A swapped mapping can fake it. If the “drift” is really the wrong stick doing the wrong thing, someone may have remapped the controller. In the Xbox Accessories app, open Configure and check the mapping; restore the defaults before diagnosing hardware.
Now take the reading this whole page is built on. Connect the controller to a Windows PC, open a browser-based gamepad tester (any tester that shows live X and Y values for each stick), put the controller flat on a table, and take your hands completely off it. Read the resting values for the drifting stick for a few seconds — drift often comes and goes, so note the worst resting value you see, not the calmest. Add the two axes together in your head as one offset: a stick resting at X +0.04, Y +0.04 is not “0.04 of drift,” it is pointing diagonally with a combined offset of about 0.06.
Write the numbers down. Here is the worked example used through the rest of this page — your numbers will differ, and that is the point of taking them:
| Worked example — left stick, hands off, flat on a table | X | Y |
|---|---|---|
| BEFORE reading | +0.12 | −0.04 |
| After recalibration (same test, same position) | +0.02 | −0.01 |
A before-reading of +0.12 / −0.04 is a stick that sits noticeably right and slightly up at rest — in a shooter, that is a slow, constant camera pan. What matters is not whether +0.12 crosses some magic line. It is what the same test says after the next step.
One warning about the numbers other guides give you: you will find pages quoting tidy verdict bands — “under 0.05 is healthy, over 0.15 is dead” on one site, “alert above 0.10, fail above 0.25” on another, sometimes from the same publisher on different pages. None of those bands comes from Microsoft, which publishes no at-rest threshold at all. Treat any band as that site’s own ruler, useful for comparing your own before and after, useless as a pass/fail stamp. The comparison is the test; the band is decoration.
Step 1 — recalibrate in the Xbox Accessories app (the fix the other guides skip)
Here is the strangest thing about this problem: read the top guides for Xbox stick drift and most of them never mention recalibration at all. Their lists run test, power cycle, firmware, cleaning spray, deadzone, warranty, soldering — eight fixes deep — without the one tool Microsoft added to the Xbox Accessories app specifically for minor stick and trigger problems. Cleaning comes first in several of them, which also destroys the evidence: once you have sprayed and scrubbed, you can no longer tell whether the cheap software fix would have worked on its own. Recalibration costs nothing, takes a couple of minutes, opens nothing, and risks nothing — so it goes first, while the before-reading is still fresh.
What the tool is, from Microsoft’s own support pages: the Xbox Accessories app — on Xbox consoles and on Windows PCs — contains a self-calibration (recalibration) tool for thumbsticks and triggers. It is supported on the Xbox Wireless Controller and the Xbox Elite Wireless Controller Series 2 only. It re-zeroes the stick’s resting position: it teaches the controller that where the stick currently sits is center. That is a real fix for a stick whose center has drifted in software or after a repair. It is not a rebuild of the sensor, and Microsoft is unusually plain about the boundary: not all stick or trigger issues can be resolved with the recalibration tool, including drift caused by normal wear and tear.
Run it in this order:
- Connect the controller and open the Xbox Accessories app. On a console: press the Xbox button, then go to Profile & system > Settings > Devices & connections > Controllers & headsets. On a PC: install the free Xbox Accessories app from the Microsoft Store and open it. (If you are also due a firmware update, the next step handles it — the app is where both live.)
- Select your controller, then select ”…” (More options) to open its device details.
- Install any firmware update offered, first. If the recalibration option does not appear at all, an out-of-date app or controller firmware is the usual reason — update both and look again. An older, unsupported model will still not show it; the tool genuinely covers only the two controller families above.
- Select Recalibration options.
- Choose the drifting stick (left or right) and select Recalibrate, then follow the on-screen steps exactly — the guided sequence asks you to move the stick through its range and let it settle back to center. Keep your hands off it during the center phase; touching it while it learns its new zero teaches it a wrong zero.
- Repeat for the other stick if it drifts too, then exit the app.
Now retest before you touch anything else. Same tester, same flat-on-the-table position, hands off. Read the result against your before numbers:
- The offset collapsed — the worked example’s +0.12 / −0.04 coming back as +0.02 / −0.01 — and the drift is gone in game: it was a calibration offset. You are done. Do not “also” clean it or raise a deadzone; stacking fixes on a fixed controller only muddies the water if drift ever returns.
- The offset shrank but a small creep remains: recalibration did part of the job. The remainder is what the deadzone step below is honestly for.
- The after-reading is much the same as the before-reading — say it returns at +0.11 / −0.04: recalibration has just given you a diagnosis, not a failure. A re-zero that does not move the reading means the resting signal itself is wrong at the sensor, which is the wear pattern. Finish the firmware and cleaning checks below once, briefly, because they are cheap — then accept the wear verdict at the end of this page rather than looping the tool. Running recalibration a second and third time on a worn stick does not wear it back.
A pattern worth naming, because it fills forums: “recalibration fixed it, then the drift came back two weeks later.” That is not the tool failing at its job — it is the tool doing exactly what Microsoft says it does on a stick whose sensor is wearing. It re-zeroed the center; the track kept wearing; the offset walked off again. Treat a fix that fades as wear evidence, not as a reason to recalibrate monthly.
Step 2 — the deadzone: a mask, in the game, and only for the remainder
A deadzone is the small area around center where the game agrees to ignore the stick. Raising it does not repair anything — it tells the game “treat this much wobble as zero” — which is precisely why it belongs after recalibration, sized to whatever offset is left, rather than before it, sized to hide the whole problem unread.
Two facts about where this setting lives, because the guides get one of them flatly wrong:
- On a standard Xbox controller, the deadzone lives in each game’s own settings (usually under controller or aim settings, sometimes split into inner/outer or left/right stick sliders), and on PC also in Steam Input. There is no system-wide deadzone slider on the console for the standard pad.
- There is no deadzone slider in the Xbox Accessories app for a standard controller either. A widely answered iFixit thread tells readers a small drift “can often be hidden with a slightly larger deadzone in the Xbox Accessories app,” and full calibration guides have been written around app screens for “Dead Zones for the left and right sticks” and “global stick dead-zone tuning” in that app. Those screens do not exist for a standard pad — readers have burned hours hunting a menu that was never there. What the app does offer the Elite Series 2 is per-stick sensitivity curves in its profiles; Microsoft notes the Delayed curve feels like a larger dead zone because the stick must travel further before the game reacts. Curves on an Elite are real. A deadzone page for a standard controller is not.
Size it from your after-reading, not from a forum number. If your after-reading’s combined offset is small — the stick creeps only slowly, only in menus — raise the game’s inner deadzone a step at a time from its default (often around 5%) toward 10%, testing in game between steps, and stop the moment the creep stops. Every extra point beyond that is aim precision you have thrown away for nothing: an oversized deadzone makes fine aim feel sticky and late, which players then misdiagnose as a second fault. And if no reasonable deadzone — say up to the mid-teens — stops the movement, the mask has told you the same thing the after-reading did: the offset is too large to hide, and this is wear, not settings.
Step 3 — update the firmware, and power-cycle once
Do this step even though it sits third, because an out-of-date controller can misbehave in ways that imitate drift — including, in one widely reported episode, a firmware-level deadzone feature misbehaving and producing drift-like movement on healthy sticks. It is also the step that makes step 1 fully available, since the recalibration tool itself arrives through app and firmware updates.
- On the console: with the controller connected, open Profile & system > Settings > Devices & connections > Controllers & headsets, select the controller’s ”…”, and install any update shown.
- On a PC: the same flow inside the Xbox Accessories app — and note the standing rule from the app: firmware does not install over a Bluetooth-only link, so connect by USB cable or the Xbox Wireless Adapter if the app does not see the controller.
- Power-cycle the controller once while you are here: hold the Xbox button for 5 to 10 seconds until it turns off, wait a few seconds, then turn it back on. That is also the follow-up Microsoft’s recalibration page itself suggests when the tool does not help, alongside the in-game deadzone, a different USB cable if you play wired, and testing on another device.
Then retest in the tester a final time and write the numbers next to the first two readings. Three readings — before, after recalibration, after update — are the whole diagnostic record. If the offset is still standing where it started, software has said everything it has to say.
Step 4 — the cleaning reality check (a debris test, not a cure)
Cleaning earns its place in this sequence, but a smaller and more honest place than most guides give it. You will read that “grime under the stick base is behind a big share of drift,” with instructions to repeat alcohol cleans two or three times. Set that against what the hardware actually is. Every standard Xbox stick — Series X|S and Elite Series 2 included — reads its position with a potentiometer: a small metal wiper sliding across a carbon track. Drift, in the great majority of controllers that develop it after months of play, is a groove worn into that track. No liquid puts carbon back. The tell is built into the test you have already run: a stick drifting from debris often reads better after one clean; a stick drifting from a worn track never does — and repeated alcohol passes carry their own cost, since alcohol can wash out the stick mechanism’s own lubricant. Clean once, as a test with a verdict attached, not as a ritual.
The once, done properly:
- Power the controller off and disconnect it.
- Compressed air first: tilt the stick fully to one side to open the gap at its base and give the gap short bursts while rotating the stick, working around the full circle. This is for loose dust and grit — the debris case.
- One damp-swab pass: a cotton swab lightly dampened — damp, never dripping — with high-strength (90%+) isopropyl alcohol, worked around the base of the stick while you rotate it in full circles. Never water, never household cleaner, and never regular WD-40: it is a lubricant, not a cleaner, it attracts dust and can damage the contacts it was meant to save. (A plastic-safe electronic contact cleaner is a different product from regular WD-40; if you use one, one short burst is the dose, not a soak.)
- Let it dry fully — give it at least five minutes — then run the tester again.
Read the result the way the sequence has taught you: reading improved and stays improved in game → it was debris, and you are done. Reading unchanged → the clean was the last piece of evidence for the wear verdict, not a step to repeat. And a boundary that outranks every fix on this page: if the controller is still in warranty, do not open it. Everything up to here is warranty-safe; the moment a shell comes off for an internal clean or a module swap, you may have traded a free replacement for a soldering project.
The wear verdict: when the stick itself is done
Call it wear when the record says so — and notice that by now you have a record, which is what separates this verdict from a guess:
- the after-recalibration reading came back close to the before-reading, or a recalibration fix faded within weeks;
- a reasonable in-game deadzone does not stop the movement;
- the firmware is current, the controller has been power-cycled, and one proper clean changed nothing;
- and the drift follows the controller across games and ideally across devices.
What is physically happening: the wiper has worn its groove, the resistance at the stick’s resting position no longer matches the position, and the controller faithfully reports a stick that is, electrically, being held slightly off-center — forever, until the sensing part is replaced. Recalibration moved the goalposts; the deadzone hid a few points of it; neither touches the groove. Guides that keep offering further software steps past this point are selling hope, not repairs. PlayStation’s controller wears by the same mechanism, incidentally — the same prove-it, recalibrate-and-retest logic applied to the DualSense is in our PS5 controller stick drift guide.
Your real options, in the order most people should take them:
- Warranty or Microsoft service first. Check the controller’s warranty status in your Microsoft account (under your devices) and start a service order there if it is covered — drift from wear is exactly the failure a warranty exists for, and it costs nothing to check before spending anything. Coverage periods differ by model and country, so read your own status in the portal rather than trusting any fixed number quoted in a guide.
- Stick-module replacement (out of warranty). The module is soldered to the controller’s board, so this is a desolder-and-solder job of intermediate difficulty — iFixit’s replacement guide calls desoldering the old module by far the hardest part. Two things make it more attractive than it used to be: replacement modules are cheap compared with a new controller, drift-resistant TMR or Hall-effect modules sense position magnetically with no wearing contact track, so the same failure cannot recur the same way — and the recalibration tool from step 1 is what you use afterward to calibrate the new module in software. If you do not solder, a local repair shop quoting for a module swap is still usually a saner spend than a new pad.
- Replacement controller. The honest choice when the pad has other wear too, or when repair quotes approach the price of new. What not to do is buy the replacement before the verdict — a new controller is also the most expensive way to discover the original problem was one game’s deadzone at zero.
What not to do
- Do not clean first and recalibrate later. You will never know which one worked, and if the clean “worked” on a wearing stick, you will repeat it monthly while the groove deepens.
- Do not hunt for a deadzone slider in the Xbox Accessories app or in console settings on a standard controller. It is in the game (or Steam Input on PC). The app screens described in some guides do not exist.
- Do not calibrate an Xbox controller with the Windows joy.cpl wizard and expect the Xbox path to use it. That legacy wizard serves the older DirectInput route; Xbox controllers run on Microsoft’s XInput stack, and the Accessories app is the supported calibration path for them.
- Do not use regular WD-40, oils or lubricants anywhere near the stick, and do not keep repeating alcohol cleans that changed nothing the first time.
- Do not open a controller that is still in warranty, and do not pay for a repair before checking that warranty in your Microsoft account.
- And the recycled chestnut, repeated here because it still ranks in drift guides: there is no pinhole reset button on an Xbox controller to poke with a paperclip — that procedure belongs to a different controller entirely. The reset is the 5-to-10-second Xbox-button hold in step 3. (If pairing itself has failed as well, our guide to an Xbox controller not connecting covers the wired test that splits that fault in half.)
Frequently asked questions
Can recalibration fix Xbox stick drift permanently? Only when the drift is a calibration offset — then yes, the re-zero is the fix, and the after-reading proves it by collapsing toward zero. When the drift is a worn potentiometer track, Microsoft states plainly that its tool cannot resolve drift caused by normal wear and tear; a recalibration that helps for a few weeks and then fades is the wear pattern announcing itself.
Where is the deadzone setting on an Xbox controller? In each game’s own controller settings for a standard controller — there is no console-wide slider and no deadzone page in the Xbox Accessories app. On PC, Steam Input also offers per-game deadzones. Elite Series 2 owners additionally get stick sensitivity curves in the Accessories app, whose Delayed curve feels like a larger dead zone.
Why does my controller drift in one game but not others? Almost always that game’s settings: a deadzone set to zero or near it will show a resting offset that every other game is quietly hiding, and some games add their own calibration layer. Microsoft’s troubleshooting starts with the same split — check the game’s controller settings and restart the game. Take the before-reading on a PC tester to see whether the stick’s offset is real but small.
Does cleaning fix stick drift? It fixes the debris case: dust or grit around the stick base that stops it returning to center. It cannot fix the wear case, because the fault is a groove in the sensor’s carbon track. Run the clean once, after recalibration, and let the retest decide — an unchanged reading after cleaning is evidence for wear, not a reason to clean again.
My controller is an older Xbox One pad and there is no Recalibration option. Why? Because the tool covers the Xbox Wireless Controller and the Elite Series 2 only, and it arrives through current app and firmware versions. Update the Xbox Accessories app and the controller firmware first; if the option still does not appear, the model is outside the tool’s support, and your software routes are the firmware update, the per-game deadzone and the clean — with the same wear verdict waiting if none of them moves the reading.
Is it worth replacing the stick module instead of buying a new controller? Out of warranty, usually yes if the rest of the pad is sound: the module is the wear part, a TMR or Hall-effect replacement removes the wear mechanism entirely, and the recalibration tool calibrates the new module afterward. It is a soldering job, though — if you would be paying a shop, compare its quote against a new controller before committing, and check your warranty status first either way.
This article follows Microsoft’s own Xbox Support guidance — the Xbox Accessories recalibration tool and its stated limits, the supported-controller list, and the controller troubleshooting sequence — checked in November 2026. It covers the Xbox Wireless Controller (Xbox Series X|S era) and the Xbox Elite Wireless Controller Series 2, on console and on Windows PC through the Xbox Accessories app.