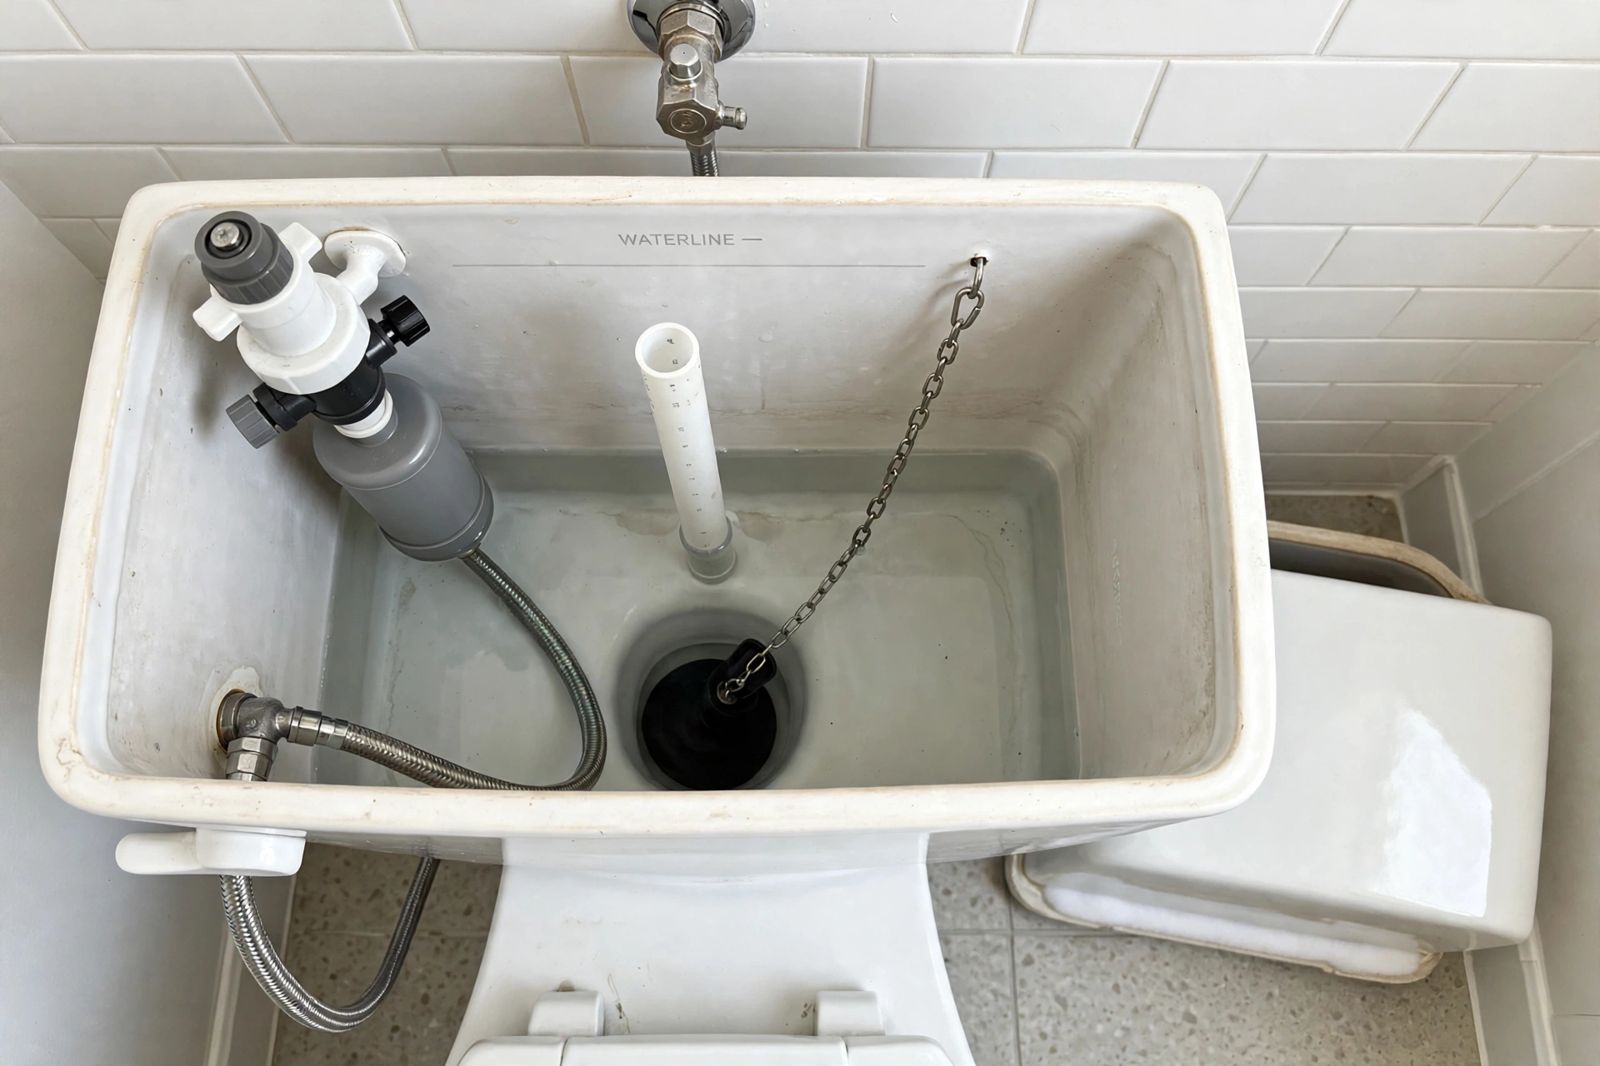
A toilet tank that will not fill is almost always blocked somewhere along one short chain: the wall supply valve, the supply line, the fill valve, or the float that tells the fill valve when to stop. Work that chain in order, from the wall inward, and you will usually find the blockage at one of those four points — most often a supply valve that is not fully open, or debris caught inside the fill valve cap, which you can wash out in minutes without buying a part. Only replace the fill valve after that wash has failed, or when the valve is old and worn.
Do not start by buying a new fill valve. That is the most common wasted purchase for this problem. Fluidmaster, which makes the fill valves fitted in a large share of US toilets, puts debris first: debris in the valve body, the supply line or the shut-off valve restricts the flow path and slows or stops filling, and its recommended first fix is to flush the debris out, not to swap the valve. Replacement is its second step, for when the wash does not restore the flow.
Slow or Not at All? That Split Points You at the Cause
“Fills slowly” and “does not fill at all” sound like the same complaint. They are not. They point at different parts of the chain, and naming which one you have before you touch anything saves most of the guesswork.
| What you see | What it usually means | Start here |
|---|---|---|
| Tank fills, but slowly — a weak trickle that takes far longer than it used to | A restriction, not a dead part: supply valve partly closed, a kinked or partly clogged supply line, or debris narrowing the fill valve inlet | Supply valve fully open, then the fill-valve cap debris wash |
| Tank does not fill at all — silent, no water entering after a flush | No flow reaching or passing the fill valve: supply valve closed, supply line blocked or kinked shut, float stuck in the raised position, or a fill valve blocked solid / failed | Supply valve, then lift and drop the float by hand, then the cap wash |
| Tank fills, then stops well below the waterline mark, so the flush is weak | The float is set too low or is stuck on the way up — it is telling the valve the tank is full when it is not | Float height and free movement |
| Tank seems never to fill, but water is running the whole time | Water is leaving as fast as it enters — usually the flapper is not sealing, so the tank drains into the bowl | Flapper and its chain, not the fill chain |
| Tank fills, empties on its own later, then refills briefly (it cycles by itself) | A slow leak out of the tank, again usually the flapper — the fill valve is only replacing lost water | The running-toilet checks in toilet keeps running |
| No toilet in the house fills, and taps are weak too | A house supply problem, not a toilet problem | Check another faucet first; if the whole house is weak, the toilet is not the place to start |
One timing correction, because a widely read plumbing page gets this wrong: that page says a tank should refill in about 10 seconds. Do not judge your toilet by that number. A normal household tank refill is a steady flow that takes on the order of a minute or more, not ten seconds — what matters is whether the flow is strong and steady, and whether it stops at the right level, about half an inch below the top of the overflow tube or at the waterline mark moulded inside the tank. A refill that has clearly become much slower than it used to be is the real warning sign, whatever the stopwatch says.
The Fill Chain, in Order
Water reaches the tank through exactly four things, in this order. Check them in this order too — each check is cheaper and easier than the one after it, and a fault early in the chain makes every later check meaningless.
1. Supply valve — is it fully open? The small valve on the wall or floor behind the toilet, usually on the left. Turn it counter-clockwise until it stops. A valve bumped during cleaning, or stiffened part-open, is enough to reduce a fill to a trickle or stop it altogether. If the handle will not move with reasonable hand pressure, or the valve leaks at its stem when you touch it, stop — do not force it. A seized supply valve is a plumber job, because forcing it can turn a no-fill problem into a flood.
2. Supply line — kinked, crushed or clogged? Follow the flexible line from the wall valve up to the bottom of the tank. Look for a sharp kink, a tight coil, or a line crushed behind the toilet. Then prove the line with the bucket test, the same test the Q&A and local-plumber pages in the top 10 rely on: turn the supply valve off, disconnect the line at the tank end, point it into a bucket, and turn the valve back on for a few seconds. A strong stream means supply and line are fine and the problem is inside the tank. A trickle or nothing means the fault is the valve, the line, or the pressure upstream of them — and no new fill valve will fix it.
3. Fill-valve cap — wash the debris out before you replace anything. This is the step the replace-first advice skips, and it fixes a large share of slow and stopped fills. Debris — grit, rust flakes, mineral scale, especially after work on the water main — lodges under the fill valve seal and chokes the inlet. Fluidmaster’s own procedure for its 400-series valves:
- Turn the water supply off and flush the tank.
- Reach in with your right hand under the float cup, lift it all the way up and hold the grey shaft steady. Do not let the float cup drop or the shaft turn.
- With your left hand on top of the cap and your thumb on the arm coming out of it, turn the cap and lever counter-clockwise about 1/8 of a turn to unlock it, then lift the cap off.
- Inspect the seal — the rubber disc with a pin through it — and the valve opening for debris, and rinse what you find.
- Hold a cup upside down over the open valve and turn the supply on full force for 10 to 15 seconds. The pressure blows the debris out of the valve inlet; the cup keeps it from spraying the room.
- Turn the supply off, put the cap back with its arm next to the refill tube, and lock it by pressing down while turning it and the arm clockwise.
- Turn the water back on and flush. A strong, steady refill means you are done.
If the wash restores the flow but it fades again within days, debris is still arriving from upstream or the seal itself is worn. Fluidmaster’s repair parts for that case are the 242 replacement seal, or the 385 top cap assembly that includes it — still a small part, not a whole valve.
4. Float — is it stuck, or set too low? The float rides the water up and shuts the fill valve off at the top. Two different faults hide here. A float stuck in the raised position — caught on the tank wall, the overflow tube or the flush chain — holds the valve closed, so nothing fills at all: free it by hand and watch whether it drops when you flush and rises smoothly as the tank fills. A float set too low does the opposite job badly: it shuts the valve off early, leaving a half-filled tank and a weak flush. Raise it in small steps — a screw on top of the valve, or pinch the clip on the side of a float cup and slide it up — flushing after each change until the water stops at the waterline, about half an inch below the top of the overflow tube. On an older ball float, check whether the ball has water inside it: a waterlogged ball sits low and behaves erratically, and it gets replaced, not adjusted.
Only after all four checks should you conclude the fill valve itself has failed. Age is the honest reason left: Fluidmaster says fill valves in use for 7 years or more can have their working parts wear out. A valve that still will not fill after a clean cap wash, with good supply proven by the bucket test and a float that moves freely, is a valve to replace.
Replacing the Fill Valve (Only When the Chain Proves It)
Budget about half an hour. You need the replacement valve to match your toilet — a universal valve such as Fluidmaster’s 400A or 400H PerforMAX fits most standard gravity toilets — plus a sponge, a bucket and towels. Hand-tight is a real instruction here, not a figure of speech: over-tightening the supply connection or the valve locknut can crack the valve or the tank and cause flooding.
- Turn the supply off and flush, holding the handle down to empty the tank as far as it will go. Sponge out what remains.
- Disconnect the supply line from the bottom of the fill valve, bucket underneath.
- Unscrew the locknut under the tank that holds the valve, and lift the old valve straight out. Note the old valve’s height before you discard it — matching it gets the new valve’s height close on the first try.
- Set the new valve’s height so its critical-level mark sits at least 1 inch above the top of the overflow tube, as its instructions require. That gap is the anti-siphon protection that keeps tank water out of the house supply.
- Fit the new valve, hand-tighten the locknut, attach the refill tube so it clips above the overflow tube and points down it — clipped on top, not pushed down inside the tube, where it can siphon and make the toilet cycle on and off by itself.
- Reconnect the supply line hand-tight plus a small turn, turn the water on slowly, and check both connections for leaks while the tank fills.
- Set the final water level with the float adjustment: about half an inch below the top of the overflow tube, or at the tank’s waterline mark. Flush twice and confirm it stops there both times.
Two warnings that come straight from the manufacturer and are worth obeying. Do not use in-tank drop-in bowl cleaners containing bleach or chlorine: Fluidmaster says they damage tank components, can cause flooding, and void its warranty. And if at any point you see water on the floor from under the tank or around the base, stop and deal with that leak first — water escaping at the base is a different fault, covered in toilet leaking from base.
What It Costs
| Fix | DIY parts cost | Typical time |
|---|---|---|
| Open / free the supply valve, straighten a kinked line | $0 | 5 minutes |
| Fill-valve cap debris wash | $0 | 10–15 minutes |
| Replacement fill-valve seal (Fluidmaster 242) or cap assembly | A few dollars to about $15 | 15–20 minutes |
| New supply line | About $5–$15 | 15 minutes |
| New universal fill valve | About $10–$25 | About 30 minutes |
| New flapper (if the tank was draining, not failing to fill) | About $5–$15 | 10 minutes |
| Plumber visit for a fill problem | Commonly $150–$350 depending on the fault found | About 1 hour |
Prices are typical US retail and service ranges as of November 2026, not quotes. The shape of the table is the lesson: the first three fixes, which cover most cases, cost nothing or a few dollars, and every one of them comes before the valve replacement that so much advice jumps to first.
When to Call a Plumber
- The supply valve will not turn, or leaks at the stem when touched. Forcing a seized valve risks a burst and a flood; replacing it means working on a pressurised line.
- The bucket test gives a trickle or nothing with the valve fully open, and a new or straightened supply line does not change it. The blockage or pressure problem is upstream, in the house plumbing.
- Every fixture in the house is weak. That is a supply or main-line problem, not a toilet repair.
- The new fill valve still will not fill after a proven supply and a clean wash. Something beyond the standard chain is wrong and needs diagnosis, not a third valve.
- You find a crack in the tank or bowl, or water on the floor that is not from a connection you just touched. Cracked porcelain gets replaced, not sealed.
- The toilet is your only one and you cannot be without it while you learn the job. Paying for a one-visit fix is reasonable, and you now know enough to check that the chain was worked in order.
Frequently Asked Questions
Why is my toilet tank not filling at all, with no sound? Silence means no water is moving. That points to the start of the chain: the supply valve is closed or seized, the supply line is blocked or kinked shut, or the float is stuck up holding the valve closed. Prove it with the bucket test — strong flow into the bucket moves the fault inside the tank; no flow keeps it at the valve, line or house supply.
Why does my tank fill so slowly all of a sudden? A sudden change usually means debris. Work on the water main, a disturbed supply valve, or a stirred-up line sends grit into the fill valve inlet, where it narrows the flow. That is exactly the case the cap debris wash exists for, and it is why the wash comes before any replacement.
How long should a toilet tank take to refill? Longer than the “about 10 seconds” one popular plumbing page claims. Judge yours against itself: a steady, strong flow that stops cleanly at the waterline — about half an inch below the top of the overflow tube — is normal, even if it takes a minute or more. A flow that has become a weak trickle, or that takes several minutes, is a restriction to clear, starting with the supply valve and the cap wash.
Can I just replace the fill valve instead of cleaning it? You can, and if the valve is 7 or more years old it may be due. But replacing first wastes the part surprisingly often: if the real fault was a partly closed supply valve, a clogged line, or debris that a 15-second wash would have cleared, the new valve fills exactly as badly as the old one. The chain order exists so the part you buy is the part that was broken.
Why does the tank fill, then empty and refill on its own? That cycling means the tank is losing water between flushes, and the fill valve is only topping it back up. The usual cause is a flapper that no longer seals. Put food colouring in the tank and wait 10 to 15 minutes without flushing: colour in the bowl confirms the leak. The US EPA’s WaterSense guidance is to check the flapper periodically and replace it at least every five years.
The bowl stays low even though the tank fills. Is that the same problem? No — that is the refill tube. A small tube from the fill valve sends water down the overflow tube to refill the bowl while the tank refills. If it has slipped off, the bowl stays low while the tank fills normally. Clip it back on top of the overflow tube, pointing down it, and the bowl level returns.
Sources: Fluidmaster — Toilet Tank Not Filling or Fills Slowly (debris first, cap-removal and 10–15 second flush procedure, 7-year wear, 242 seal / 385 cap / 400A / 400H parts, bleach-cleaner warning); Fluidmaster 400-series installation guidance via manufacturer instructions (critical-level mark at least 1 inch above the overflow tube, water level about 1/2 inch below the overflow top, refill tube clipped above the tube, do not over-tighten); ABC Home & Commercial — Toilet Tank Not Filling but Water Is Running and JustAnswer plumbing Q&A (bucket test for the supply line). Prices are typical ranges, not quotes.