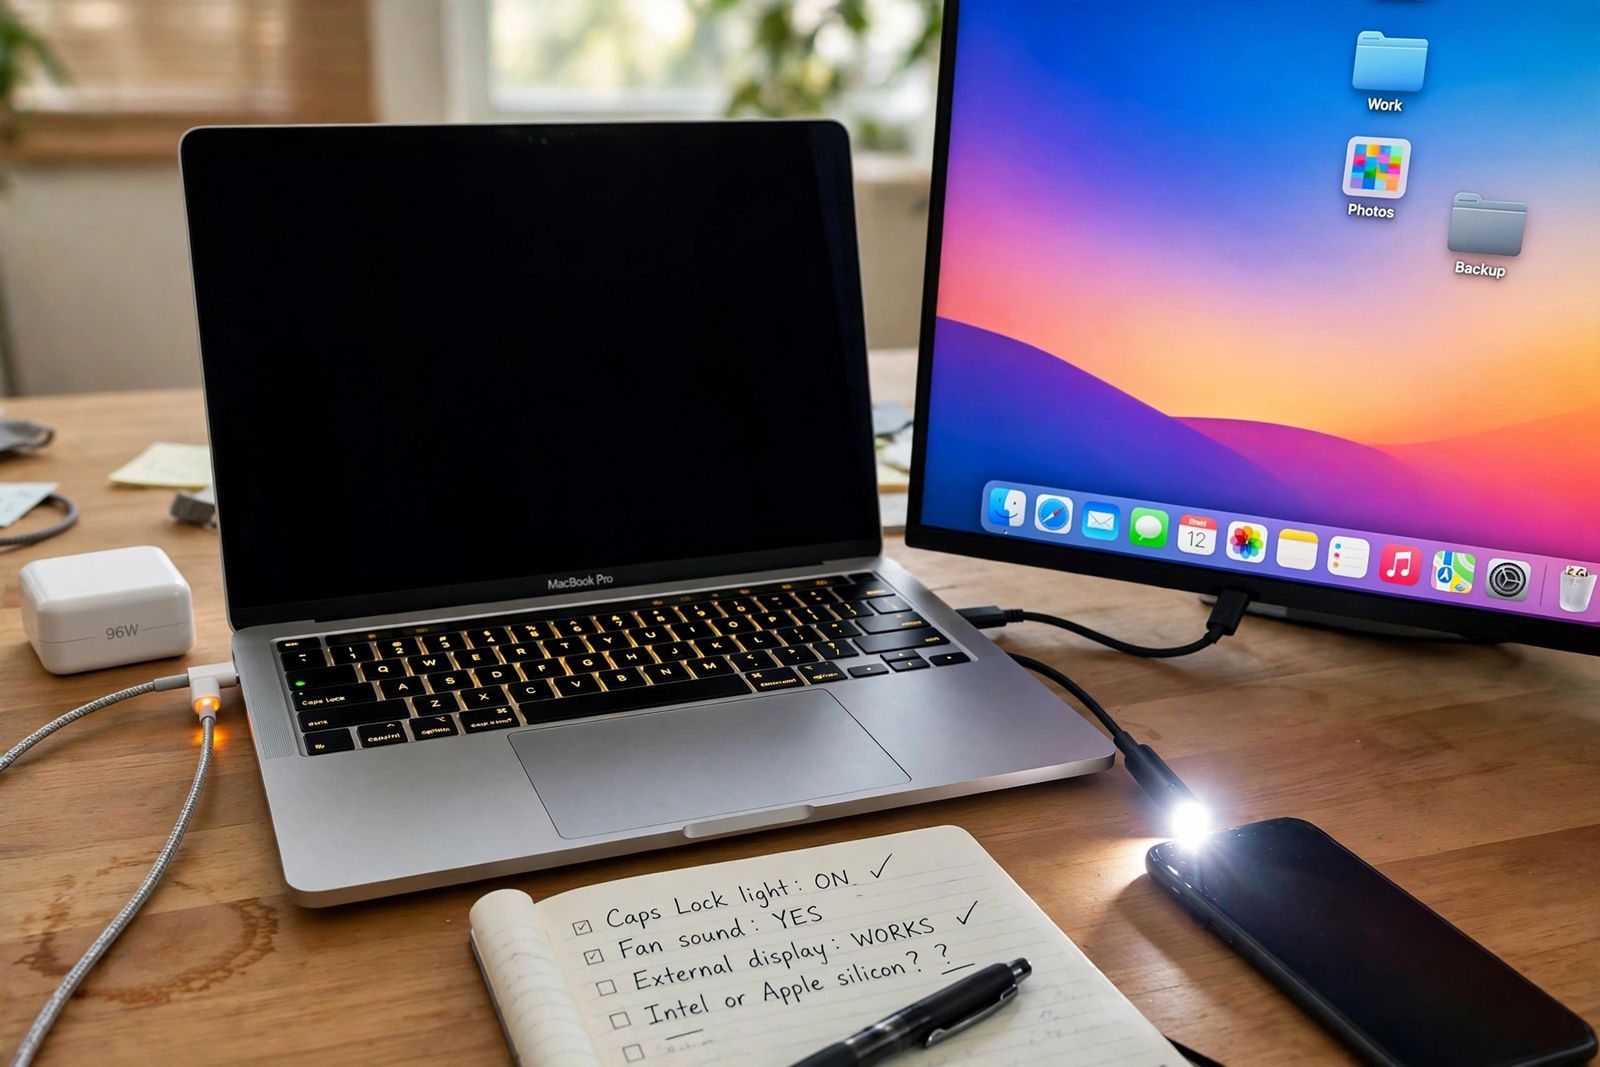
If your MacBook is not turning on, split it by chip before you reset anything: on a MacBook with Apple silicon (M1, M2, M3, M4 and later) there is no SMC reset to perform — Apple says the system management functions reset automatically when the Mac is plugged in and restarted or shut down and turned on again — while an Intel MacBook has real reset procedures, and they differ again between models with the T2 chip and models without it. Then work in this order: prove the power with the right-wattage charger in the right port, do Apple’s 10-second power hold, and separate a dead screen from a dead machine with the Caps Lock light, the sounds, a flashlight and an external display. Most “dead” MacBooks are a drained battery, an underpowered or faulty charger, a stuck power state or a running machine with a black screen — and each of those has a different fix, so the chip split and the screen test come before any reset marathon or repair quote.
First, which chip? The split every later step depends on
Almost every reset step for this fault exists in two versions, and pressing the Intel version on an Apple-silicon MacBook does nothing at all — the machine only responds to its power button at startup. So establish the chip before touching a key combination:
- Apple silicon: any MacBook Air or MacBook Pro with an M-series chip — M1 (from late 2020) onward. If the Mac still starts at all, Apple menu > About This Mac shows an item labelled Chip.
- Intel: About This Mac instead shows Processor followed by an Intel processor name. Intel MacBooks then split once more: models from 2018–2020 mostly carry the Apple T2 Security Chip, and the SMC procedure for a T2 model is different from the procedure for an older Intel model without one.
If the MacBook will not start at all, use its age and model as the guide: a MacBook bought new from 2021 onward is Apple silicon; a 2018–2020 Intel model is the T2 group; anything earlier is the older Intel group. Write down which group yours is in — every section below is labelled by it, and mixing the groups up is the single most common way this fault gets “fixed” for an hour with no result.
The correction: there is no SMC reset on Apple silicon, whatever the guide says
This is the most repeated error in guides to this fault, and it wastes more time than any other, so it gets its own correction before the steps. Widely read guides still present an SMC key combination as a current, universal MacBook step — one long-standing guide instructs “current MacBooks without a removable battery” to hold Shift + Control + Option + Power as the way to reset the SMC, with no chip split at all. That combination is an older Intel procedure. On an Apple-silicon MacBook there is no separate SMC to reset by hand: Apple folds those functions into the chip, and Apple’s SMC article states the whole Apple-silicon procedure in one breath — make sure the Mac is plugged into power, then either choose Restart from the Apple menu or choose Shut Down and press the power button to turn it on again. No other steps are needed, because the SMC resets automatically on a Mac with Apple silicon. The same split applies to NVRAM: the Option + Command + P + R reset exists only on Intel Macs; on Apple silicon it is neither available nor needed, and guides that walk an M-series owner through holding those keys (one widely read guide even tells you to hold them together with the power button for 20 seconds) are describing a procedure your machine does not have.
| Your MacBook | SMC / power-management reset | NVRAM reset |
|---|---|---|
| Apple silicon (M1 and later) | None exists. Plug into power, then Restart, or Shut Down and press the power button to turn on. That is the complete procedure | None exists, and none is needed |
| Intel with T2 chip (mostly 2018–2020) | First: shut down, hold the power button for 10 seconds, release, wait a few seconds, turn on. If the fault persists: shut down, hold Control (left) + Option (left) + Shift (right) for 7 seconds, then press and hold the power button as well and hold all four for 7 more seconds, release, wait a few seconds, turn on | Turn on and immediately hold Option + Command + P + R for about 20 seconds |
| Intel without T2 (pre-2018 notebooks) | Shut down, hold Shift + Control + Option (left side) together with the power button for 10 seconds, release all four, then press the power button to turn on | Same as the T2 row: Option + Command + P + R, about 20 seconds, at startup |
Note what the table does not contain: a single Intel combo presented as if it covered every Intel MacBook. Some guides give exactly that — one 10-second combo for all Intel models — which is wrong for every T2 machine, and T2 machines are most of the Intel MacBooks still in daily use. Use your row, and only your row.
Step 1: prove the power — wattage and port, in test order
A MacBook that shows nothing at all is a power question first, and “plugged in” is not proof of power. Work this test order exactly, because each step rules out one link and the order is cheapest first:
- The outlet. Plug directly into a wall outlet you have seen work today — not a power strip — and reseat every connection: wall to adapter, adapter to cable, cable to MacBook. On a MagSafe cable, look at the connector light: amber means charging, green means charged, and no light at all means no power is arriving — start again at the outlet and cable.
- Give a drained battery time before you judge it. A deeply drained MacBook can sit apparently dead on the charger before it will respond. Rivals put this wait at 10 minutes in one guide and 30 minutes in three others, with no source attached to either figure; Apple’s own long-storage guidance — for a MacBook coming out of long-term storage — is 20 minutes. The honest practice: leave it on a known-good charger for a full 30 minutes before declaring it dead, because that covers every version of the advice, and do not keep interrupting the wait with power-button presses.
- The wattage. Read the wattage printed on the adapter. Enough to run a MacBook is not always enough to start a drained one or to charge it under load — a small phone-class adapter can leave a big MacBook looking dead. As a floor, test with an adapter of at least the wattage your MacBook came with. Apple’s fast-charge combinations show the scale: MacBook Air models from 2022 fast-charge from 67W or 70W adapters (the 15-inch from 70W), the 14-inch MacBook Pro from 96W, and the 16-inch MacBook Pro only from 140W. You do not need fast-charge wattage to start a MacBook — but an adapter far below your model’s own, such as a 30W adapter on a 16-inch Pro, is a suspect, not a test.
- The cable is part of the wattage. An ordinary USB-C charge cable carries up to 60W; above that the cable itself must be rated for more. A 96W or 140W adapter feeding a MacBook through a plain 60W cable is a 60W charger as far as the MacBook is concerned — which is why “I tried a bigger brick and nothing changed” proves nothing until the cable is swapped too. For 140W fast charging on a 16-inch MacBook Pro from 2021 to early 2023, Apple lists the USB-C to MagSafe 3 cable as the route; 16-inch models introduced in November 2023 or later can also fast-charge over a 240W USB-C cable.
- The port, in order. Your Mac charges over only one port at a time — Apple notes it uses whichever connected source offers the most power — so test one port at a time, in this order: first the MagSafe 3 port if your model has one (it removes the cable-rating question from the test when paired with its own cable), then each USB-C / Thunderbolt port in turn. Inspect each port before plugging in: compacted lint and debris in a USB-C port stop the connector seating fully, and a plug that is almost in is a silent no-charge. Clear loose debris gently. Finish by trying a second, known-good charger and cable if you can borrow one — a charger that charges another MacBook is proven in a way no label reading can match.
While you test, disconnect everything else — hubs, docks, drives, external displays. A faulty accessory or a dock that is itself holding power can block a start, and Apple’s own sequence for this fault includes disconnecting accessories and trying again. If the MacBook charges but will not charge and run at the same time, or the percentage falls while it is plugged in, that is the wider charging fault worked through step by step in laptop plugged in not charging — the wattage logic there applies to MacBooks as much as to Windows laptops.
Step 2: Apple’s power hold, then your chip’s reset
With power proven as far as you can prove it, do the force-shutdown-and-start exactly as Apple’s “If your Mac doesn’t turn on” page sequences it:
- Make sure the MacBook is connected to AC power.
- Press and hold the power button for at least 10 seconds, then release. On a MacBook with Touch ID, the Touch ID button is the power button — press and hold it.
- If you see no change, press and release the power button normally, once.
- If the MacBook now turns on but stops at another screen during startup, it is no longer a “won’t turn on” fault — it is a startup fault, and the Recovery and Safe Mode section below is your route.
If the hold changes nothing, disconnect all accessories and repeat it once. Only then move to your chip’s reset from the table above: on Apple silicon, the plugged-in restart-or-shutdown in that table is the whole of it (if the Mac will not respond at all, the 10-second hold you just did is the forced version of the same reset); on Intel, do the SMC row for your T2 group, and leave the NVRAM reset until after the Mac shows some sign of starting — NVRAM holds settings such as the startup disk and volume, and resetting it is a startup-settings step, not a no-power step. Do not run reset after reset in a loop: one correct procedure, done once, then read the result with the next section’s tests.
Step 3: screen dead or machine dead? The four checks
A MacBook can be fully started with a black screen — which is a display fault, not a dead machine, and a very different repair. Before any further resets, run these four checks in order and write down each answer:
| Check | What to do, exactly | If this happens | What it means |
|---|---|---|---|
| 1. Caps Lock light | Press Caps Lock and watch the small light on the key itself | The light toggles on and off as you press | The keyboard and the system behind it are responding — the Mac has started. Treat this as a picture problem and keep going |
| The light never changes | No sign of life from this check. Note it and continue — it does not, on its own, prove the machine is dead | ||
| 2. Sounds and feel | In a quiet room, press the power button and listen and feel: fan spin-up on Pro and Intel models, any startup sound, a trackpad that clicks when pressed (a powered MacBook’s trackpad clicks; an unpowered one feels dead and hollow), warmth after a few minutes | Any of these signs, with a black screen | The machine is on. The fault is in the picture path, not the power path |
| Complete silence, no click, no lights, no warmth | Points back to power: return to step 1 with a second charger before anything else | ||
| 3. Flashlight check | With the Mac given a minute after starting, dim the room and hold a phone light close to the black screen at a shallow angle | A faint ghost of the desktop, menu bar or login box is visible in the beam | The panel is still drawing the picture — the backlight or its feed has failed. Your files are untouched and the Mac is usable on an external screen |
| Nothing visible | Inconclusive alone; read it with check 4 | ||
| 4. External display | Connect a monitor or TV you have seen working today (HDMI, or USB-C with video), select its exact input, and restart the MacBook | A normal desktop on the external screen while the built-in screen stays black | The Mac is proven healthy — chip, memory, storage and macOS all work. The fault is inside the built-in display chain. Back up your files now, while you have a working desktop |
| Black on both screens | The fault is not isolated to the built-in screen. Return to your chip’s reset if you have not done it, then the stop-testing section |
Raise the brightness once, too — the brightness-up key, pressed several times — because a screen dimmed to zero is indistinguishable from a dead one. These are the same checks, run in a Windows order, in laptop screen is black; that article’s sequence is the companion to this one if the machine in front of you turns out to be a Windows laptop, and its verdict logic — Caps Lock plus sounds plus external display, read together — is identical.
If it turns on but does not finish starting: Safe Mode, Recovery, Diagnostics
Once the MacBook shows any startup life — a logo, a progress bar, startup options — it has left this article’s fault and entered Apple’s startup tools. Use the route for your chip:
- Safe Mode loads only the essentials and checks the startup disk as it goes. On Apple silicon: shut down, press and hold the power button until “Loading startup options” appears, select your startup disk, hold Shift, and click Continue in Safe Mode. On Intel: turn on or restart and immediately hold Shift until the login window appears. Reaching the desktop in Safe Mode points at a login item, extension or update problem rather than hardware.
- macOS Recovery is where the disk gets repaired. On Apple silicon: shut down, hold the power button until startup options appear, click Options, then Continue. On Intel: turn on and immediately hold Command + R until the Apple logo or a spinning globe appears. In Recovery, open Disk Utility, select your startup volume, and run First Aid; reinstalling macOS from Recovery is the later step, and it is designed to keep your files — but back up first if the Mac gives you any working route to do so.
- Apple Diagnostics tests the hardware and returns reference codes. On Apple silicon: start with the Mac off, hold the power button until startup options appear, release, then press and hold Command + D until Diagnostics starts. On Intel: turn on and immediately hold D; if nothing happens, try Option + D. Write any reference code down word for word — it is the most useful thing you can hand to a repairer. One limit, stated plainly: a completely unresponsive MacBook cannot run Diagnostics, Safe Mode or Recovery at all. Those tools need a machine that at least begins to start; a no-response machine is a power or board fault, and no key combination reaches software it cannot load.
When to stop testing
Stop and hand it over — to Apple or an authorised service provider if it is in warranty or AppleCare, a reputable repairer if not — when any of these is true: no response at all after a full 30 minutes on a known-good, right-wattage charger, the 10-second hold done correctly, and your chip’s reset done once; the machine starts and shuts down in a loop; or Diagnostics returns a hardware reference code. Stop immediately and unplug if there was a liquid spill (do not charge it or keep pressing power to “test” it — every attempt spreads corrosion), if you smell burning, or if the case is swollen, the bottom no longer sits flat or the trackpad sits proud: that is a swollen battery, a safety fault, not a troubleshooting step. One advanced route exists beyond this article and belongs in that handover conversation, not in home testing: a MacBook with Apple silicon or a T2 chip that still will not start can sometimes have its firmware revived using a second, working Mac — Apple’s Revive procedure — while its sibling, Restore, erases the Mac. Ask the service provider about Revive by name; do not let an erase be the first thing tried on a machine holding unbacked-up work. Bring whoever you hand it to your notes: the charger wattage and ports you tested, the Caps Lock, sound, flashlight and external-display results, and any Diagnostics code. That record is real diagnostic work, and it should shorten both the conversation and the quote.
Frequently asked questions
How do I reset the SMC on an M1, M2, M3 or M4 MacBook? You don’t — there is no manual SMC reset on Apple silicon. Plug the MacBook into power, then restart it, or shut it down and press the power button to turn it on again. Apple states that the SMC resets automatically on a Mac with Apple silicon and that no other steps are needed. Any guide giving you a Shift + Control + Option combination for an M-series MacBook is giving you an Intel procedure that your machine ignores.
My MacBook is plugged in but will not turn on and shows no charging light. What does that mean? On a MagSafe cable, no light means no power is reaching the MacBook — the break is at the outlet, the adapter, the cable or the port seating, before the MacBook itself is even involved. Work the step 1 order: direct wall outlet, reseat every connection, check the port for compacted debris, test a second known-good charger, and give a drained battery a full 30 minutes before judging it. On USB-C models there is no connector light to read, which makes the second-charger test and the port-by-port test the decisive checks.
How long should I hold the power button on a MacBook that won’t turn on? At least 10 seconds, then release — that is Apple’s figure in its “If your Mac doesn’t turn on” sequence, for every Mac. Then press and release the button normally once. The longer holds you will see in other guides belong to different procedures: the Intel T2 SMC sequence holds its key combinations for 7 seconds and then 7 more, and the NVRAM reset holds its keys for about 20 seconds at startup on Intel only. They are not interchangeable, and none of them applies to Apple silicon.
My MacBook screen is black but I can hear the fan. Is it dead? Almost certainly not. Fan, sounds, a clicking trackpad or a toggling Caps Lock light with a black screen means the Mac has started and the fault is in the picture path. Connect an external display: a good desktop there proves the Mac healthy and isolates the fault to the built-in display chain. Then use the flashlight check — a faint image in the beam means the backlight has failed while the panel still draws the picture.
Will resetting the SMC or NVRAM delete my files? No. Neither reset touches your files, apps or macOS settings in your user account; the SMC governs power behaviour and NVRAM holds a small set of startup settings such as volume and startup-disk selection. The steps in this fault that can cost files are the later ones — a macOS reinstall done carelessly, and above all a firmware Restore, which erases the Mac. That is why the resets come early, the backups come the moment any screen works, and Restore is a service conversation, not a home fix.
Can a cheap low-wattage charger stop a MacBook from turning on? It can leave one looking dead. A deeply drained MacBook on an adapter far below the wattage it shipped with — a 30W phone-class adapter on a 16-inch MacBook Pro, which Apple pairs with 140W — may not gather enough to respond, and a standard USB-C cable caps any adapter at 60W regardless of the number on the brick. Test with the adapter the MacBook came with, or one of equal or higher wattage through a cable rated for it, before concluding the MacBook itself has failed.
This article is general information, based on Apple Support’s “If your Mac doesn’t turn on” page, Apple’s SMC and NVRAM reset articles and Apple’s published power-adapter and fast-charge guidance, all linked above and checked in November 2026. Procedures differ by chip and model year — the About This Mac Chip/Processor line and your model’s support page are the authority for your machine. If the MacBook is under warranty, run the tests, record the results, and let Apple’s service do the opening.